Due to planned maintenance, I needed to temporary move the blog to my home network to prevent downtime. Hosting a public facing website without precautions, can cause threat actors to laterally move through the network. To lower the risk, the web server running the blog needed to run in a DMZ, separated from the rest of my equipment.
At home I use an Ubiquity EdgeRouter 6P for routing, VPN, NAT and firewalling. On an EdgeRouter, creating a DMZ is not as easy as ticking a checkbox in the UI.
Let me show you how to configure a dual-stack DMZ (for IPv4 and IPv6) in this post.
The environment
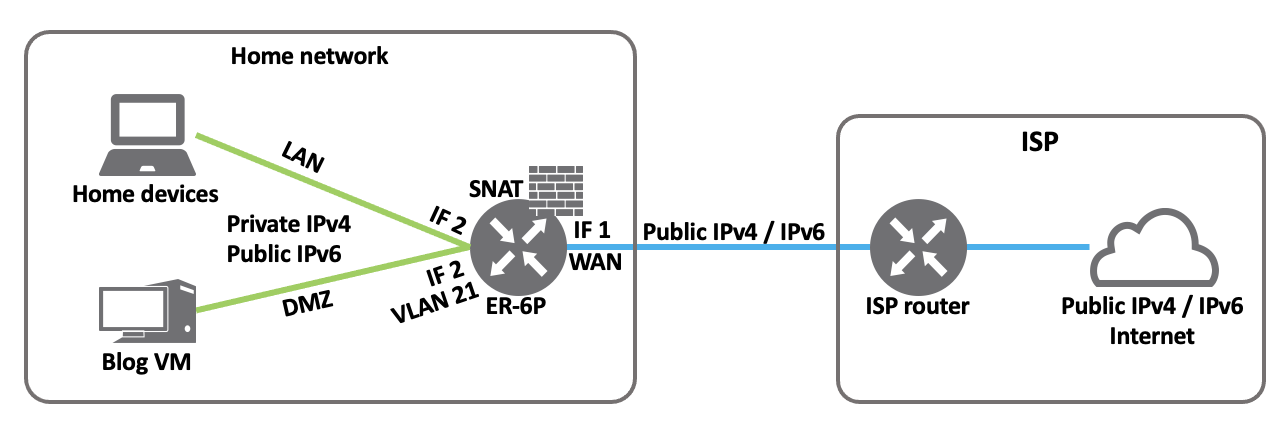
The drawing is a bit simplified, but shows the essence. The IP’s used in this post are are fictitious.
- WAN (Internet) is attached port 1
- Single public IPv4 address
- 192.0.2.1
- /56 public IPv6 block
- 2001:db8:10:10::/56
- Single public IPv4 address
- LAN is attached to port 2 (untagged)
- Private IPv4 block
- 192.168.20.0/24
- /64 Public IPv6 block
- 2001:db8:10:1020::/64
- Private IPv4 block
- New VLAN for DMZ on port 2 (tagged)
- Private IPv4 block
- 192.168.21.0/24
- Public IPv6 block
- 2001:db8:10:1021::/64
- Private IPv4 block
NAT variants used
During the part when the NAT is configured for IPv4, two NAT variants are used, which are DNAT and Hairpin NAT. They both have their own use-cases.
DNAT
A DNAT or Destination NAT is traditionally used to make a service (for example a webserver) available to the Internet. In such a use-case, request to the public IP of the webserver are send to a router. The router translates the public IP and port to the private IP and port of the webserver based on the NAT configuration.
Hairpin NAT
The Hairpin NAT variant has a different use-case compared to DNAT. When you host a public available website on your private network and access it from the Internet, DNAT is used. When you want to access the same website from a laptop in your private network, Hairpin NAT should be used.
That way traffic to the FQDN of the website, which uses the public IP is hair-pinned via the external interface of the router. Because the traffic is hair-pinned via the external interface, the certificate stays valid.
The setup
In general the steps to create a DMZ on an EdgeRouter are:
- Configure new VLAN and gateway
- Configure IP network groups
- Configure Firewall rules
- Configure DNAT
- Configure Hairpin NAT
- Attach Firewall rules to interfaces
Configure new VLAN and gateway
Using the config below it configures:
- Create VLAN 21 on Interface eth2
- Assign a private IPv4 address to the VLAN based router Interface
- Assign a public IPv6 address to the VLAN based router Interface (using SLAAC)
user@er-6p# set interfaces ethernet eth2 vif 21
 address 192.168.21.254/24
 address 2001:db8:10:1021::f/64
 description DMZ
 ipv6 {
     dup-addr-detect-transmits 1
     router-advert {
         cur-hop-limit 64
         link-mtu 0
         managed-flag false
         max-interval 600
         other-config-flag false
         prefix 2001:db8:10:1021::/64 {
             autonomous-flag true
             on-link-flag true
             valid-lifetime 86400
         }
         reachable-time 0
         retrans-timer 0
         send-advert true
     }
 }
Configure IP network groups
Before creating rules, it’s smart to first create the IP network groups which are used to ease the firewall configuration by grouping IP blocks. The network groups are used when creating the firewall rules.
IPv4 group
user@er-6p# set firewall group network-group LAN_NETWORKS
 description "RFC1918 IP ranges"
 network 192.168.0.0/16
 network 172.16.0.0/12
 network 10.0.0.0/8
IPv6 group
user@er-6p# set firewall group ipv6-network-group LAN6_NETWORKS
 description "Own IPv6 public range"
 ipv6-network 2001:db8:10:10::/56
Configure Firewall rules
A couple of firewall rules are needed to block or allow IPv4 and IPv6 traffic. In general the traffic flows below can be identified.
- Block DMZ to LAN
- Allow DMZ to router
- Allow WAN to DMZ
Block DMZ to LAN
IPv4
The default action for the DMZ_IN policy is accept to allow traffic to the Internet, while dropping traffic to the Internal (LAN) network via the “LAN_NETWORKS” group.
user@er-6p# set firewall name DMZ_IN
 default-action accept
 description "DMZ to LAN/WAN"
 rule 10 {
     action accept
     description "Allow Web to LAN"
     destination {
         address 192.168.20.0/24
     }
     protocol tcp
     source {
         address 192.168.21.1
         port 443
     }
 }
 rule 20 {
     action drop
     description "Drop DMZ to LAN"
     destination {
         group {
             network-group LAN_NETWORKS
         }
     }
     log disable
     protocol tcp
 }
IPv6
The default action for the DMZ6_IN policy is accept to allow traffic to the Internet, while dropping traffic to the Internal (LAN) network via the “LAN6_NETWORKS” group.
user@er-6p# set firewall ipv6-name DMZ6_IN
 default-action accept
 description "DMZ to LAN6/WAN6"
 rule 10 {
     action accept
     description "Allow Web to LAN"
     destination {
         address 2001:db8:10:1020::/64
     }
     protocol tcp
     source {
         address 2001:db8:10:1021:15:be57:b109:1
     }
 }
 rule 20 {
     action drop
     description "Drop DMZ to LAN6"
     destination {
         group {
             ipv6-network-group LAN6_NETWORKS
         }
     }
     log disable
     protocol tcp
 }
Allow DMZ to router
This section shows the allow rule for incoming DNS requests to the routers gateway interface. All other traffic to the router interfice is blocked. When DHCP is used in the DMZ network, allow that traffic type also.
In this case the webserver has a dual-stack configuration and therefore using DNS via IPv4 is sufficient.
user@er-6p# set firewall
 name DMZ_LOCAL {
     default-action drop
     description "DMZ to EdgeRouter"
     rule 10 {
         action accept
         description "Allow DNS"
         destination {
             port 53
         }
         log disable
         protocol tcp_udp
     }
 }
Allow WAN to DMZ
This section shows the allow rules for traffic from the Internet to the webserver for HTTP(S).
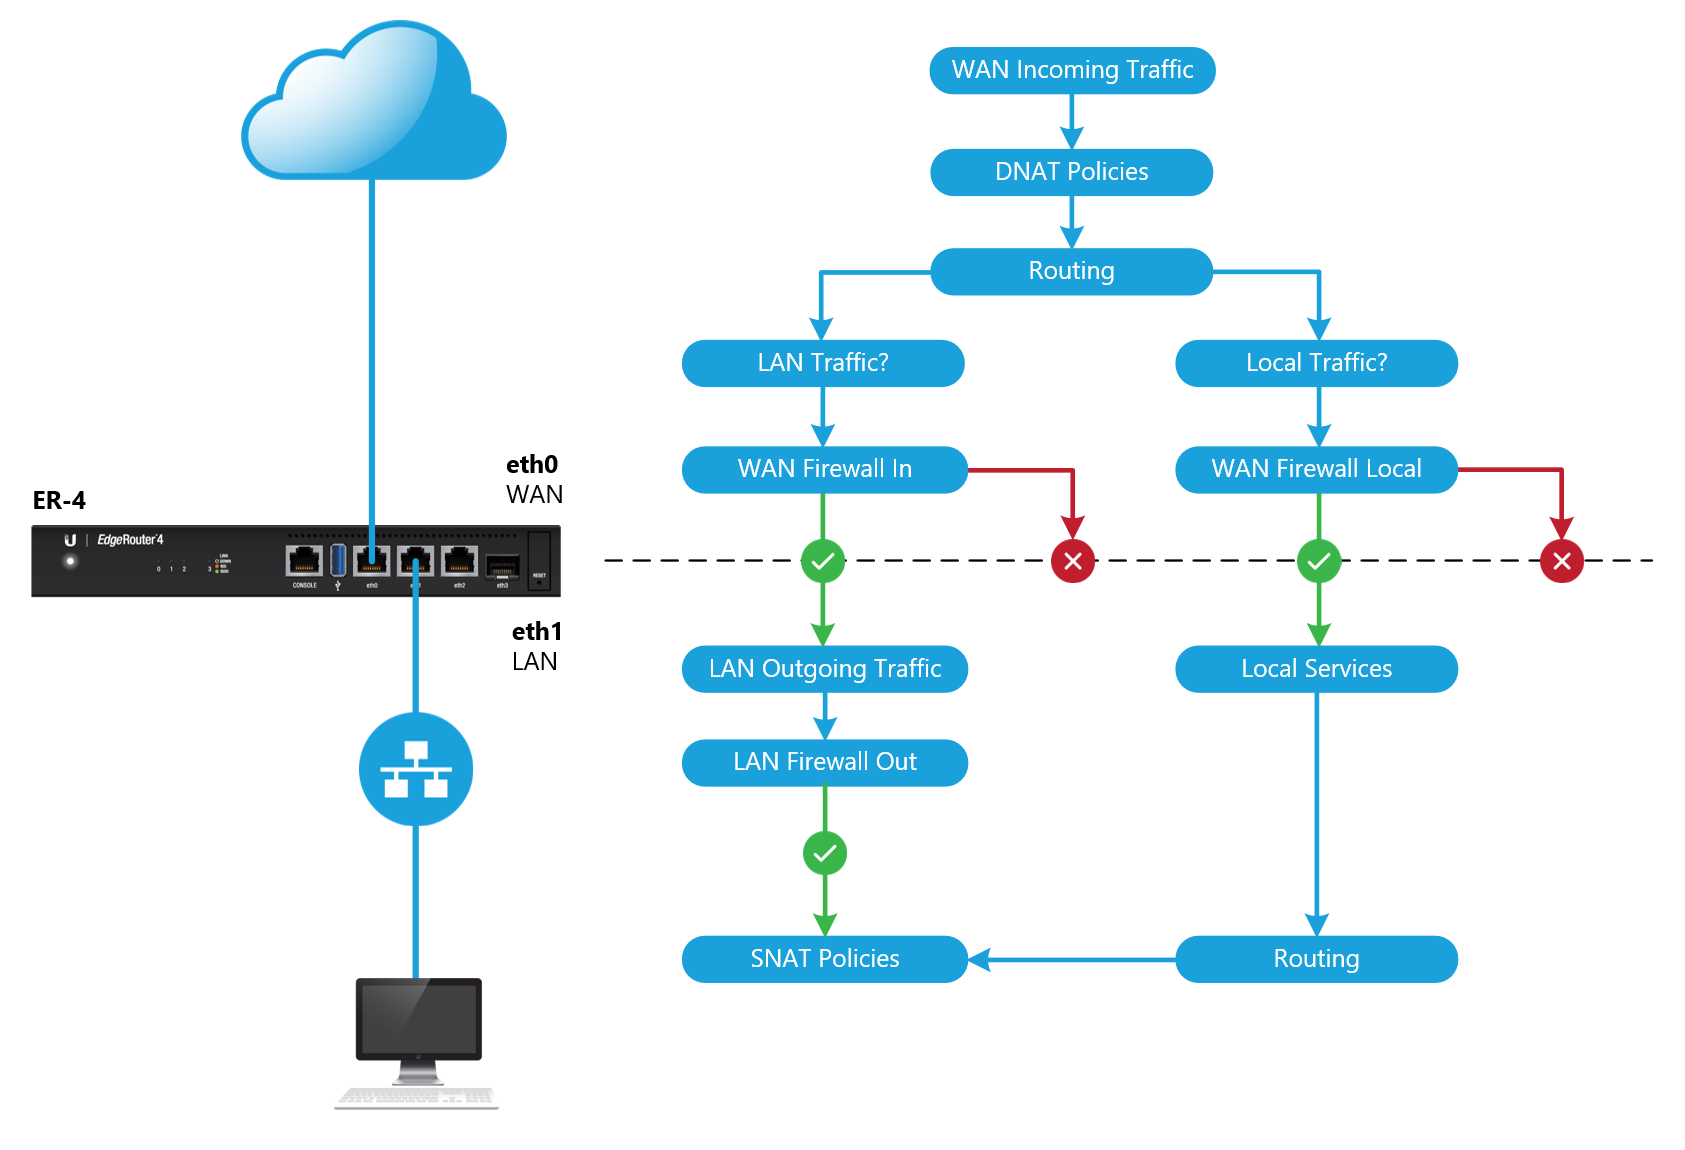
IPv4
Rule 21 and 22 are configured to allow traffic to private IPv4 address, since the DNAT is processed before the firewall rule as can be seen below.
user@er-6p# set firewall
 name WAN_IN {
     default-action drop
     description "WAN to internal"
     rule 20 {
         action accept
         description "Allow established/related"
         state {
             established enable
             related enable
         }
     }
     rule 21 {
         action accept
         description http
         destination {
             address 192.168.21.1
             port 80
         }
         log disable
         protocol tcp
     }
     rule 22 {
         action accept
         description https
         destination {
             address 192.168.21.1
             port 443
         }
         log disable
         protocol tcp
     }
     rule 30 {
         action drop
         description "Drop invalid state"
         state {
             invalid enable
         }
     }
}
IPv6
For IPv6 the public address of the webservers are listed in rule 31 and 32 because NAT is not needed in this case.
user@er-6p# set firewall
 ipv6-name WAN6_IN {
     default-action drop
     rule 10 {
         action accept
         description "Allow established/related"
         protocol all
         state {
             established enable
             related enable
         }
     }
     rule 20 {
         action drop
         description "Drop invalid packets"
         protocol all
         state {
             invalid enable
         }
     }
     rule 30 {
         action accept
         description "Allow ICMPv6"
         protocol icmpv6
     }
     rule 31 {
         action accept
         description "Allow HTTP to DMZ Webserver"
         destination {
             address 2001:db8:10:1021:15:be57:b109:1
             port 80
         }
         log disable
         protocol tcp
     }
     rule 32 {
         action accept
         description "Allow HTTPS to DMZ Webserver"
         destination {
             address 2001:db8:10:1021:15:be57:b109:1
             port 443
         }
         log disable
         protocol tcp
     }
}
Configure DNAT
Configure the public IP / port to private IP / port mapping using DNAT for IPv4 traffic.
user@er-6p# set service nat
 rule 1 {
     description web-dnat-http
     destination {
         address 192.0.2.1
         port 80
     }
     inbound-interface eth1
     inside-address {
         address 192.168.21.1
         port 80
     }
     log disable
     protocol tcp
     type destination
 }
 rule 2 {
     description blog-dnat-https
     destination {
         address 192.0.2.1
         port 443
     }
     inbound-interface eth1
     inside-address {
         address 192.168.21.1
         port 443
     }
     log disable
     protocol tcp
     type destination
 }
Configure Hairpin NAT
Configure the hair-pinning of internal sourced IPv4 traffic to the public IP (FQDN) of the internal hosted website to keep a valid TLS communication.
First add both of the Hairpin NAT rules using DNAT with eth2 set as the inbound Interface.
user@er-6p# show service nat
 rule 11 {
     description web-hairpin-dnat-http
     destination {
         address 192.0.2.1
         port 80
     }
     inbound-interface eth2
     inside-address {
         address 192.168.21.1
         port 80
     }
     log disable
     protocol tcp
     type destination
 }
 rule 12 {
     description web-hairpin-dnat-https
     destination {
         address 192.0.2.1
         port 443
     }
     inbound-interface eth2
     inside-address {
         address 192.168.21.1
         port 443
     }
     log disable
     protocol tcp
     type destination
 }
Secondly add both of the Hairpin NAT rules using Source NAT (SNAT) with eth2.21 as the outbound Interface.
user@er-6p# show service nat
 rule 5000 {
     description web-hairpin-snat-http
     destination {
         address 192.168.21.1
         port 80
     }
     log disable
     outbound-interface eth2.21
     protocol tcp
     source {
         address 192.168.20.0/24
     }
     type masquerade
 }
 rule 5001 {
     description web-hairpin-snat-http
     destination {
         address 192.168.21.1
         port 443
     }
     log disable
     outbound-interface eth2.21
     protocol tcp
     source {
         address 192.168.20.0/24
     }
     type masquerade
 }
Attach Firewall rules to DMZ interface
As a last step the new DMZ_IN, DMZ6_IN and DMZ_LOCAL firewall rules need to be attached to the DMZ interface. The firewall rules in the other sections we already pre-existing and only need some modification.
user@er-6p# set interfaces ethernet eth2 vif 21
 firewall {
     in {
         ipv6-name DMZ6_IN
         name DMZ_IN
     }
     local {
         name DMZ_LOCAL
     }
 }
Future enhancements
Use established / related firewall configuration for the return traffic from the DMZ Webserver to the LAN network when the traffic was initiated from the LAN network. In the DMZ_IN and DMZ6_IN policy, rule 10 was added to allow the traffic from the webserver back to the LAN network to make it work.
Ideally the return traffic should be established / rated traffic based on the firewall policy LAN_IN and LAN6_IN, but that’s something to sort out later. I someone has some ideas on this, please let me know.
To conclude
It was good fun to learn how a DMZ could be created on a EdgeRouter and eventually it worked just fine. An improvement could be made to better implement the return traffic (see section above), but for now it’s fine.
Useful links
Ubiquity documentation
EdgeRouter – Packets Processing
6 Comments
Petar Brcic · August 23, 2023 at 3:01 pm
Great article! This is topic relevant for any network that handle DMZ traffic. It also represents the complexity of the solution that could not be avoided.
Thanks Daniel.
Daniël Zuthof · August 25, 2023 at 3:47 pm
Thanks as always for you feedback, Petar!
Ton Boelens · September 27, 2023 at 11:53 am
Daniël, thanks for this well written article. I have the same router, zo this is very helpfull for me.
Is it somehow possible to make a backup of your configuration, so that I can use this as a jumpstart?
Daniël Zuthof · September 28, 2023 at 8:19 pm
Hi Ton. Thanks for your kind words and reaction. Let’s continue the conversation on LinkedIn.
Chuck Benedict · January 11, 2024 at 2:47 am
This was a very helpful post I used to configure my own EdgeRouter 4. In my case, I had VLANs configured on the switch for private vs DMZ servers and a physical interface connected router to switch for each VLAN (unnecessary with tagging, probably, but I can keep things straight easier). I also had port mappings outside-inside differ. But, otherwise, everything just worked. Thank you!
Daniël Zuthof · January 15, 2024 at 11:17 am
Hey Check,
Thanks for your nice feedback. Glad it helped.
Cheers, Daniel