In this IPv6 series I’d like to tell you about my “journey” to implement the protocol at home and in the lab. This part explains how IPv6 can be used with NSX-T in the datacenter. Expect the creation and / or configuration of T0 and T1 routers, Uplink configuration, Static upstream routing and Segments while touching ND profiles and IP autoconfiguration in related posts.
Let’s go to the bits.
The Series
The first two parts of this series describe the basics and how to implement IPv6 in my home network using a tunneling technique called 6RD. Using the 6RD tunnel, my ISP assigned a /56 prefix, which is awesome. Lots of subnetting possibilities.
Part 3 and 4 talk about obtaining a prefix and thinking through a suitable IP plan. Also it gives food for thoughts about dual stack configuration of your routers and essential services like DNS, DHCP, NTP and AAA. Finally it describes how to route IPv6 traffic in a secure way using a VPN.
Other parts in this IPv6 series are:
- Part 1: IPv6 Primer
- Part 2: IPv6 at home using 6RD
- Part 3: Native IPv6 in the Lab
- Part 4: IPSec VPN
- Part 5: IPv6 with NSX-T (this post)
Probable outline of next part(s) (subject to change)
- Part 6: IPv6 with Cloud Director
The configuration
Before starting the configuration, I assume NSX-T manager is already installed, Edge Nodes are deployed and the Edge Cluster is created. Also a compute cluster should be prepared for NSX-T, overlay networking is established within the compute cluster and extended to the Edge Nodes. Lastly the Edges Nodes should be attached to a segment for upstream router connectivity. In my case a VLAN based segment.
The next sections explain how IPv6 can be enabled and configured. Basically it starts with creating the T0 router, configure its Uplink and configure upstream routing. Afterwards create a ND Profile, create a T1 router, create Segments and Segment Profiles.
Using ND profiles, the needed IP autoconfiguration methods below can be chosen. In separate post, I have written an overview of all the NSX-T IPv6 features and explained the IPv6 Autoconfiguration options.

Step 1: Enable IPv6
The default configuration of NSX-T is IPv4 Only. Enable IPv6 by going to “Networking” > “Global Networking Config” and change the “L3 Forwarding Mode” to “IPv4 and IPv6”.
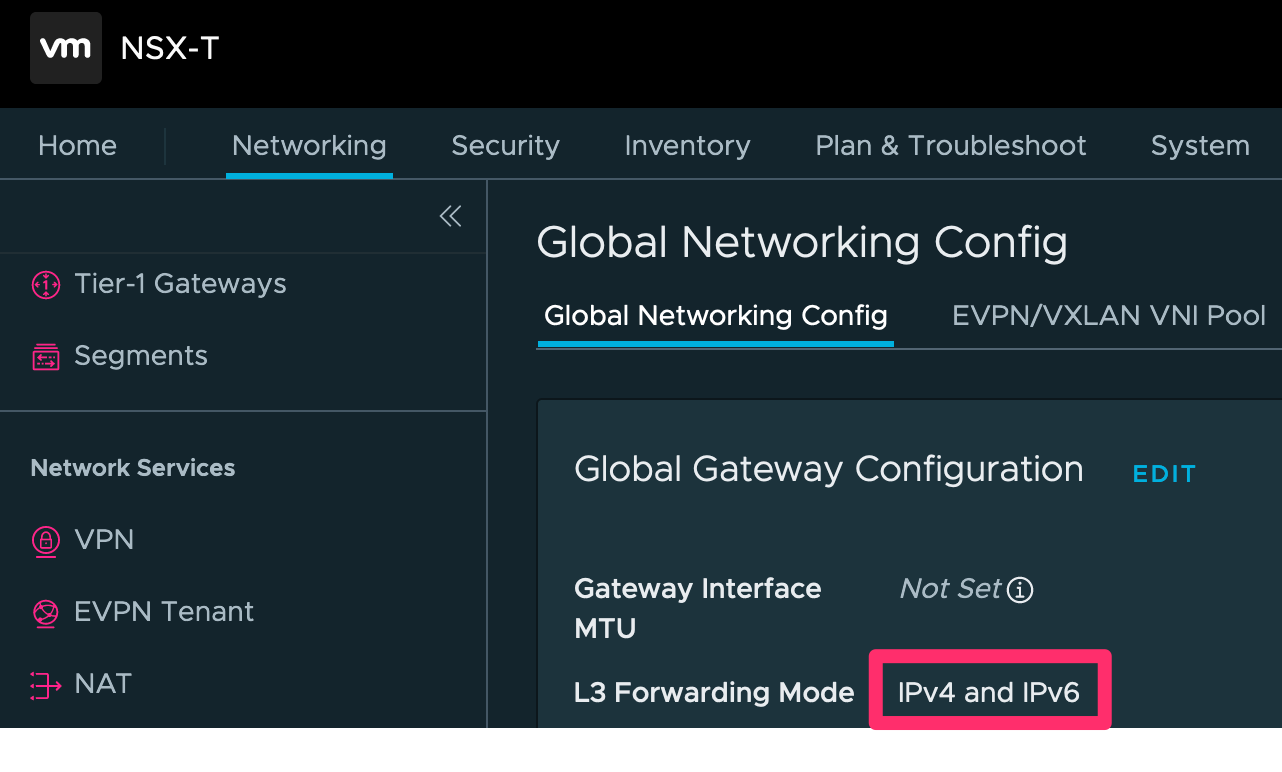
If you ask yourself what happens when enabling IPV6 in the NSX-T Manager. Well, by enabling IPv6, dual-stack addressing on the RouterLink ports will be configured. This is the overlay network between the T0 and T1.
Secondly, dual-stack addressing is configured on the Intra-router Transit Link. This is the overlay network between the SR and DR component of a T0 or T1. For a T1, the Intra-router Transit Link is only created if stateful services are configured.

The Routerlink and Intra-tier Transit Link use different types of IP addresses which are explained below:
RouterLink
- IPv4 Reserved (100.64.0.0/10)
- /16 prefix default used in NSX-T Manager
- /31 prefixes are derived from the /16 upon T1 creation
- IPv6 Unique Local Addresses (fc00::/8)
- /64 prefixes are derived from the /8 upon T1 creation
Intra-tier Transit Link
- IPv4 Link-local a.k.a. APIPA (169.254.0.0/16)
- /25 prefixes (UI shows /24) and are derived automatically from the /16 upon T0 / T1 creation
- IPv6 Link-Local (fe80::/10)
- /64 prefixes are derived automatically from the /10 upon T0 / T1 creation
Step 2: T0 Creation
Let’s start with a fresh T0 called “T0-Lab” and configure upstream static routing in a dual-stacked way. In this small lab environment static routing will work just fine. The final result of creating and configuring the T0 looks like this:

When creating a new T0, the minimum required configuration consists of:
- Name of the T0
- HA Mode
- Edge Cluster

Save the newly created T0 and continue the configuration of the Uplink and Upstream routing. Which is explained in more detail in the steps below. Make sure the newly created T0 is in “Editing Mode”.
Uplink config
Go to “Interfaces” > “External and Service Interfaces” > “Set”. Now configure the Uplink name, IP addresses and Connected Segment to enable upstream connectivity to the lab router. The Connected Segment in this case is a VLAN that connects to the upstream pfSense Lab Router.

Upstream routing config
Go to “Routing” > “Static Routes” > “Set”. Now add default routes for IPv4 and IPv6. Also configure the next hop IP addresses for both protocols as part of creating the default routes.

Configure the Next Hop IP address for both IPv4 and IPv6 as part of creating the default (static) route.

Step 3: Create the ND Profile
The order does not really matter, but in this post the T0 is created before the ND profile and T1 router. ND profiles are needed for IPv6 router advertisement (RA), IP autoconfiguration and configuring IP parameters (DNS, NTP).
A default ND profile is available and configured as “SLAAC with DNS through RA”. The default ND profile could be used for dual-stacked environments that have a IPv4 based DHCP server configured. For other use-cases a new ND profile could be created. For details which RA mode one to use for a certain use-case.
A new ND Profile can be created by going to “Networking Profiles” > “IPv6” > “Select Profile Type” > “ND Profiles”.

Step 4: T1 Creation
A T1 is mostly used for connecting the actual workload segments to NSX-T. When creating a new one, the minimum required configuration consists of:
- Name of T1
- Linked T0
- Edge Cluster
- Fail-over mode
- Edge Size.
In this case the T1 size “Routing” suffices. Larger Edges are only needed when using them for load-balancing or large scale NAT deployments. Take a look a the VMware Configmax page for details. Save the new T1 and continue its configuration for ND / DAD Profiles and Route Advertisement.

ND / DAD Profiles
Depending on the IPv6 autoconfiguration method needed, select the ND profile created in step 3. To change it, go to “Additional Settings” and select the profile. This way, connected hosts will get the correct IPv6 address and / or parameters. It’s important to mention however that all connected segment to this T1 will inherit the settings from the ND Profile.
The Duplicate Address Detection (DAD) profile is set to “default” after creation. The “default” profile is configured as “Loose”. For more info, see the post “IPv6 Autoconfiguration explained“.

Route Advertisement
Lastly, check the “Route Advertisement” (not to be confused with router advertisement) section and change it to your needs. By default only prefixes of connected segments and service ports are redistributed to the upstream T0.

Step 5: Segment creation
In most cases VM’s and other types of workloads will be connected to a segment that is connected to a T1 router. Surely a segment can be connected to a T0 or even not to a router at all.
In this example I will create a dual-stacked segment and connect it to a T1 created previously. The minimum required configuration of a segment consists of.
- Segment name
- Connected gateway (or None)
- Transport Zone
- IPv4 and IPv6 Subnet

In this case I select the overlay Transport Zone and add a IPv4 and IPv6 gateway CIDR. For IPv6, the gateway CIDR will be the router address that is advertised via Route Advertisements (RA). After creating the segment, additional segment parameters like DHCP, NAT or firewalling can be configured.
Often DHCP services are needed segement. If so, the steps would include:
- Create a DHCP Profile in Server mode
- Configure a IP address (if blank, 100.96.0.1/30 is used)
- Bind profile to an Edge Cluster
- Bind the profile to a T1 router (optional)
- Configure DHCP on a Segment
- Configure a DHCP Server IP address
- Configure a IP range
- Configure other DHCP parameters (DNS, NTP, etc.)
When new segment is added to the T1 (with statefull services enabled), the result is displayed below.

To conclude
All the basics are mentioned now to start using IPv6 in NSX-T. Looking back at versions before 2.4, the support for IPv6 was lacking. Nowadays in the 3.x versions, lot’s of necessary features are added, making it a good fit in production environments.
Next steps would probably include configuring the Distibuted Firewall, Gateway Firewall and dynamic routing. In addition to that extra T0 / T1 routers, Segments and features like DHCP are probably being used. Don’t forget to check the “Segment Security” and / or “IP Discovery” policies if DHCP or firewalling features do not work as expected.
This IPv6 main series is nearing the end by now. If interesting topic arise I’ll write a post about it. The only main topic left is the IPv6 support in Cloud Director (VCD). I’m particular interested which features are available in the latest release and how the features are implemented in NSX-T with multi-tenancy in mind.
The Cloud Director post about IPv6 has to wait a bit until my family and I moved to our new house. When the house is finished and moving is done, expect a follow-up post in the August-September timeframe.
This leaves me wishing everyone a deserved summer holiday, enjoy!
Cheers, Daniël
5 Comments
Michael · February 24, 2023 at 8:20 am
No IPv6 IPSec VPN available at NSX-T?
Daniël Zuthof · February 27, 2023 at 9:34 am
Just tested with NSX 4.0.1.1. IPv6 IPSec VPN is not supported. It generates an error message “Must be a valid IPv4 address” while configuring the Local Endpoint.
Daniël Zuthof · March 21, 2023 at 8:50 pm
The latest 4.1 version of NSX has IPv6 support 🤩, and I’ve updated the blog post accordingly.
Daniel · December 19, 2023 at 12:44 pm
When will your integration with vCloud be posted?
Daniël Zuthof · December 20, 2023 at 11:31 am
Hi 👋,
It’s on my todo list. As a coincidence some others asked also about it last week. Seems there is need for additional explanation on this topic.
I hope to be able to start on this in a couple of weeks.
Cheers, Daniel