After the release of VMware Cloud Director 10.1 (yes, you read it correctly, the lowercase “v” is gone now), it was time to re-installed my lab environment a. Because of the new name, the acronym is now slightly different (VCD instead of vCD).
During the re-install and config process I stumbled upon some issues, that in hindsight took quite some time to fix. Because of that, the idea of this blog series was born to hopefully save time for others.
Part two: Deploy VCD appliances with OVF Tool
The site name is a part of the VCD multisite feature, to distinguish between separate sites, but even in a (default) single-site installation, the site name itself is visible to tenants and thus should have a proper name. As far I can see, changing the site name itself is not mentioned in the official documentation, so from that perspective a post is needed.
Update 2-2-2022
Since version 10.3.x the site name can be changed in the provider part of the UI.
The issue
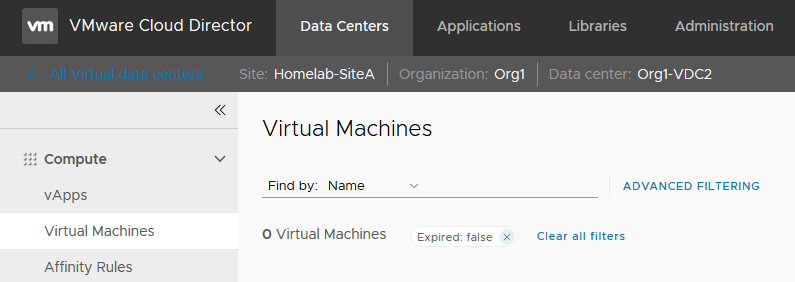
The first tidbit is about changing the VCD site name. After fixing the appliance deploy and SSL issues (more to that in upcoming posts), I noticed that the site name was shown in the UI in the form of an IP address. Showing it as an IP address is quite ugly in my opinion, so that had to change. In the screenshot below the site name is visible in the Org VDC context.
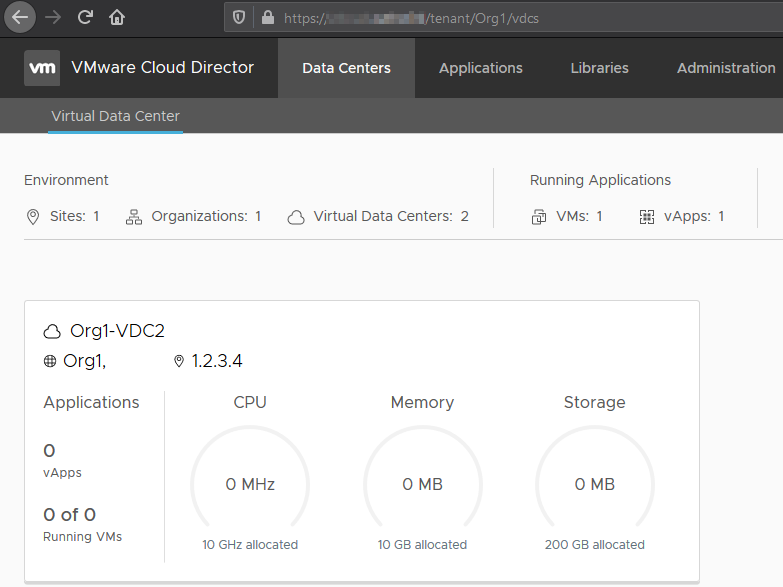
When going into the context of an OrgVDC, the IP address also pops-up at the top.
When looking at one of Daniel Paluszek’s latest posts, I saw that he uses a custom site name. After chatting with him about it, he pointed out that the name can be modified with an API call and nowadays also in the UI. Let me show you how.
The solution
UI
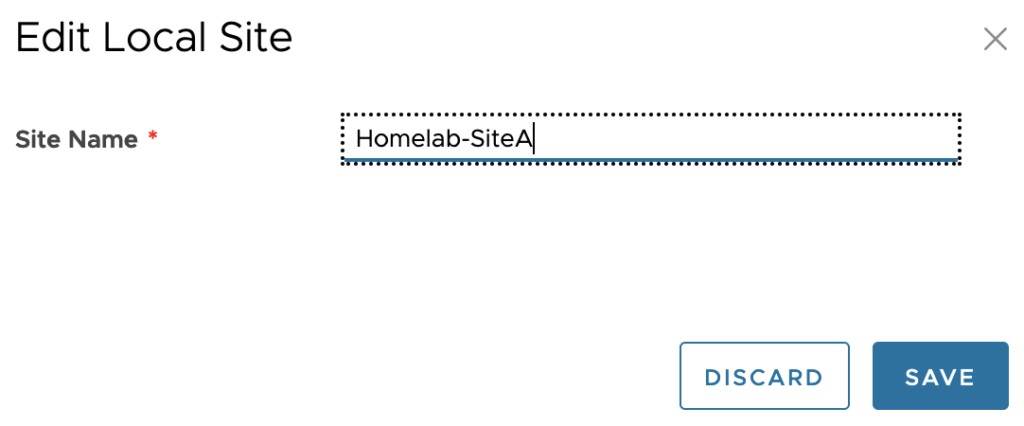
In the UI the site name can be changed since Cloud Director 10.3.x. To change the site name goto: Administration > Settings > General > Site
API
Start by using you favorite API tool. Mine is Postman. I you’re not that familiar with this matter, use one of the guides on this matter to get started manipulating that API. Tom Fojta wrote an article about how to use Postman in combination with VCD. Also take a look at Simon Greaves his latest post about vCloud Director REST API (vCloud API) for more in-depth info.
In the code snippets below change
- Change the <VCD FQDN> in the API URL and the in code in step 4.
- Copy the <VCD SITEID> from the output in step 3 into the PUT command in step 4.
- Change the <Site name> in step 4 with your own.
1: Check the available API versions and use the latest version possible by performing a GET to:
URL
GET: https://<VCD FQDN>/api/versions

Body
<?xml version="1.0" encoding="UTF-8" standalone="yes"?>
<SupportedVersions ... >
    <VersionInfo deprecated="true">
        <Version>27.0</Version>
        <LoginUrl>https://<VCD FQDN>/api/sessions</LoginUrl>
    </VersionInfo>
    ...
    <VersionInfo deprecated="false">
        <Version>34.0</Version>
        <LoginUrl>https://<VCD FQDN>/api/sessions</LoginUrl>
    </VersionInfo>
    <SchemaRoot>https://<VCD FQDN>/api/v1.5/schema/</SchemaRoot>
</SupportedVersions>
2: Login the the VCD API using a “System Admininistrator” equal account by performing a POST to:
URL
POST: https://<VCD FQDN>/api/sessions

Headers
Accept: application/*+xml;version=34.0
3: Fetch the current site name configuration by performing a GET to:
URL
GET: https://<VCD FQDN>/api/site/associations/localAssociationData

Headers
Accept: application/*+xml;version=34.0

Body
<?xml version="1.0" encoding="UTF-8" standalone="yes"?>
<SiteAssociationMember ...>
    <RestEndpoint>https://<VCD FQDN></RestEndpoint>
    <BaseUiEndpoint>https://<VCD FQDN></BaseUiEndpoint>
    <RestEndpointCertificate>
    ...
    </RestEndpointCertificate>
    <SiteId>urn:vcloud:site:<VCD SITEID></SiteId>
    <SiteName>1.2.3.4</SiteName>
    <PublicKey>
    ...
    </PublicKey>
</SiteAssociationMember>
4: Change the actual site name by performing a PUT request to:
URL
PUT: https://<VCD FQDN>/api/site/associations/localAssociationData

Headers
Accept: application/*+xml;version=34.0
Content-Type: application/vnd.vmware.admin.siteAssociation+xml

Body (raw)
<?xml version="1.0" encoding="UTF-8" standalone="yes"?>
<SiteAssociationMember xmlns="http://www.vmware.com/vcloud/v1.5" xmlns:rasd="http://schemas.dmtf.org/wbem/wscim/1/cim-schema/2/CIM_ResourceAllocationSettingData" xmlns:ovf="http://schemas.dmtf.org/ovf/envelope/1" xmlns:vssd="http://schemas.dmtf.org/wbem/wscim/1/cim-schema/2/CIM_VirtualSystemSettingData" xmlns:common="http://schemas.dmtf.org/wbem/wscim/1/common" xmlns:vmw="http://www.vmware.com/schema/ovf" xmlns:ovfenv="http://schemas.dmtf.org/ovf/environment/1" xmlns:vmext="http://www.vmware.com/vcloud/extension/v1.5" xmlns:ns9="http://www.vmware.com/vcloud/versions" href="https://<VCD FQDN>/api/site/associations/<VCD SITEID>" type="application/vnd.vmware.admin.siteAssociation+xml">
    <RestEndpoint>https://<VCD FQDN></RestEndpoint>
    <BaseUiEndpoint>https://<VCD FQDN></BaseUiEndpoint>
    <SiteId>urn:vcloud:site:<VCD SITEID></SiteId>
    <SiteName>Homelab-SiteA</SiteName>
</SiteAssociationMember>
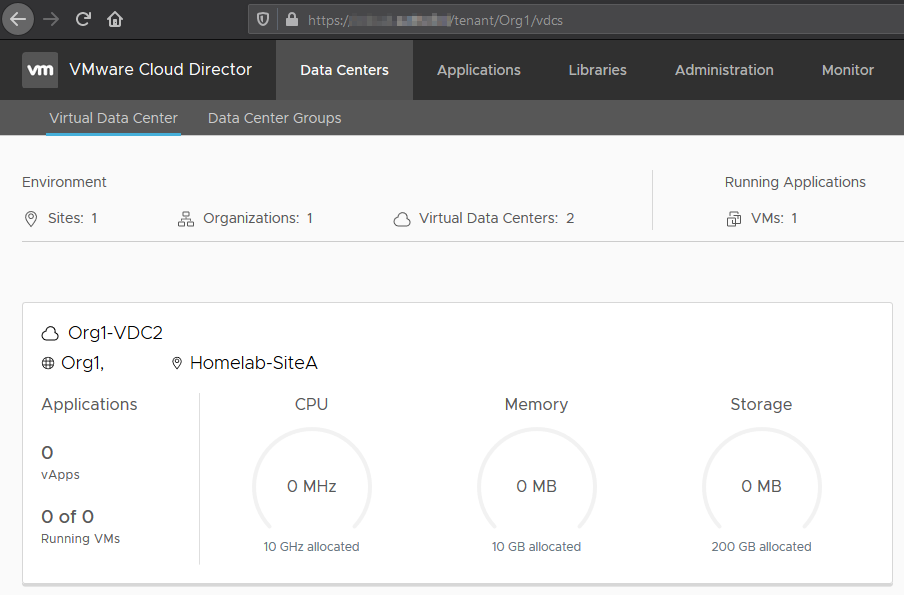
After the PUT request in step 4 is performed the change can be seen in the VCD UI after a refresh op the page. So, no need to restart the cell.
To conclude
With this change the site name can be modified to a more professional one then an IP address or lengthy FQDN. The result of the change can be seen below.
0 Comments