My latest homelab addition is the Maxtang NX6412 NUC which was given by VMware, together with Cohesity (many thanks!) at VMware Explore EU (in the US co-sponsored by NetApp) to all vExperts who registered for the gift. After adding RAM and a SATA SSD, it was time it ran vSphere 8.
The specs of this neat, passive cooled box are:
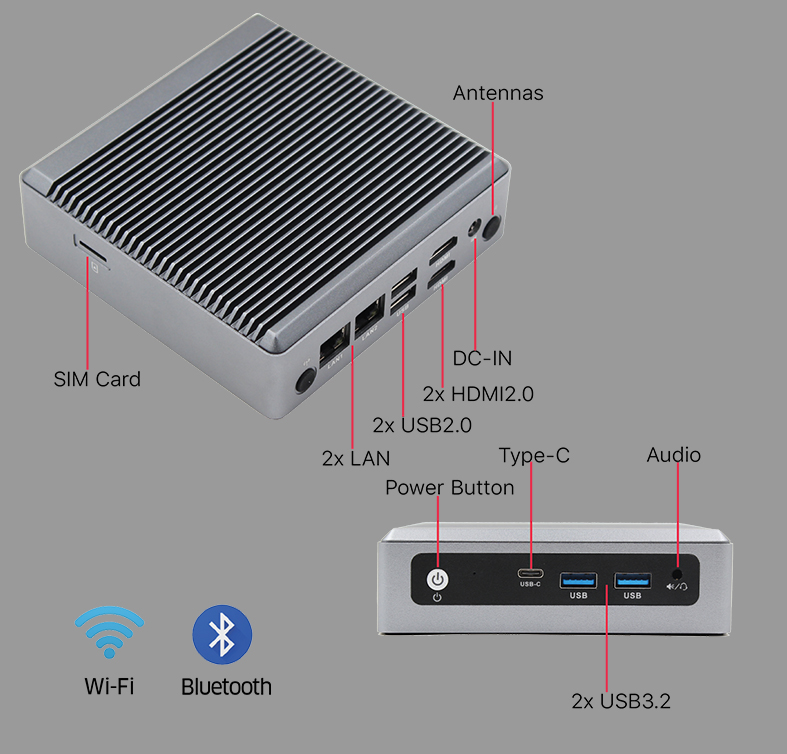
- Intel Celeron J6412 (4c @ 2.0 GHz, 2,6 GHz boost)
- 10w TDP
- 2x DDR4 PC-3200 SO-DIMM slots
- 2x 1Gb Realtek 8111H PCIe NIC
- Wifi, Bluetooth
- 2x HDMI 2.0
- 3x USB 2.0 (of which front facing USB-C type)
- 2x USB 3.2
The issue with the Maxtang NUC is that both PCIe based Realtek NIC’s and the TPM chip are not supported by ESXi 7 or 8. To solve the first I used a USB 3.0 NIC (supported by the USB Network Native Driver fling).
To make use of the unsupported NIC’s, I added both of them to a pfSense router VM which does support the Realtek PCIe NIC. The Realtek NIC can be added to the VM by adding it as a VMDirectPath I/O based pass-through device to the VM. More to that later.
Added hardware
To make the NUC work, it needed some RAM, an SSD and a supported NIC. For the RAM I chose Crucial sticks that are plenty available, new and second hand. Although the NUC has a theoretical limit of 32 GB (2x 16 GB) RAM, reports from others show that 64 GB (2x 32 GB) works just fine (not tested myself).
For the storage part I chose a WD Red over the slightly cheaper WD Blue because of it’s 50% higher durability (TBW) and higher MTTF rating.
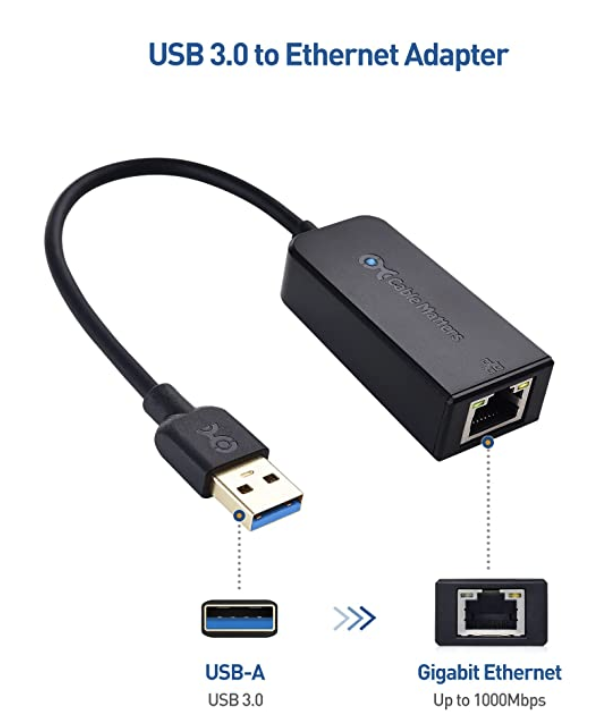
To be able to install ESXi, it needed a supported NIC for the management network. For that I used the Cable Matters 1 Gb USB 3.0 NIC, that I purchased a while ago for my Pi based ESXi on ARM setup. It turns out that it works with ESXi 7 / 8 via the USB Network Native Driver fling.
In short, I added the hardware below:
- 2x Crucial 16 GB DDR4 SO-DIMMs (CT16G4SFRA32A)
- 1x Western Digital RED 1 TB SATA SSD (SA500)
- M.2 2280 format, 600 TBW
- 1x Transcend JetFlash 780 32 GB (Amazon)
- USB 3.0, MLC
- 1x Cable Matters, 1 Gb USB 3.0 NIC (Amazon)
Installing ESXi
In my previous post I explained how to create a customized ESXi 8 ISO using the PowerCLI ImageBuilder. That step is needed because ESXi 8 does not have the inbox driver for USB Network devices.

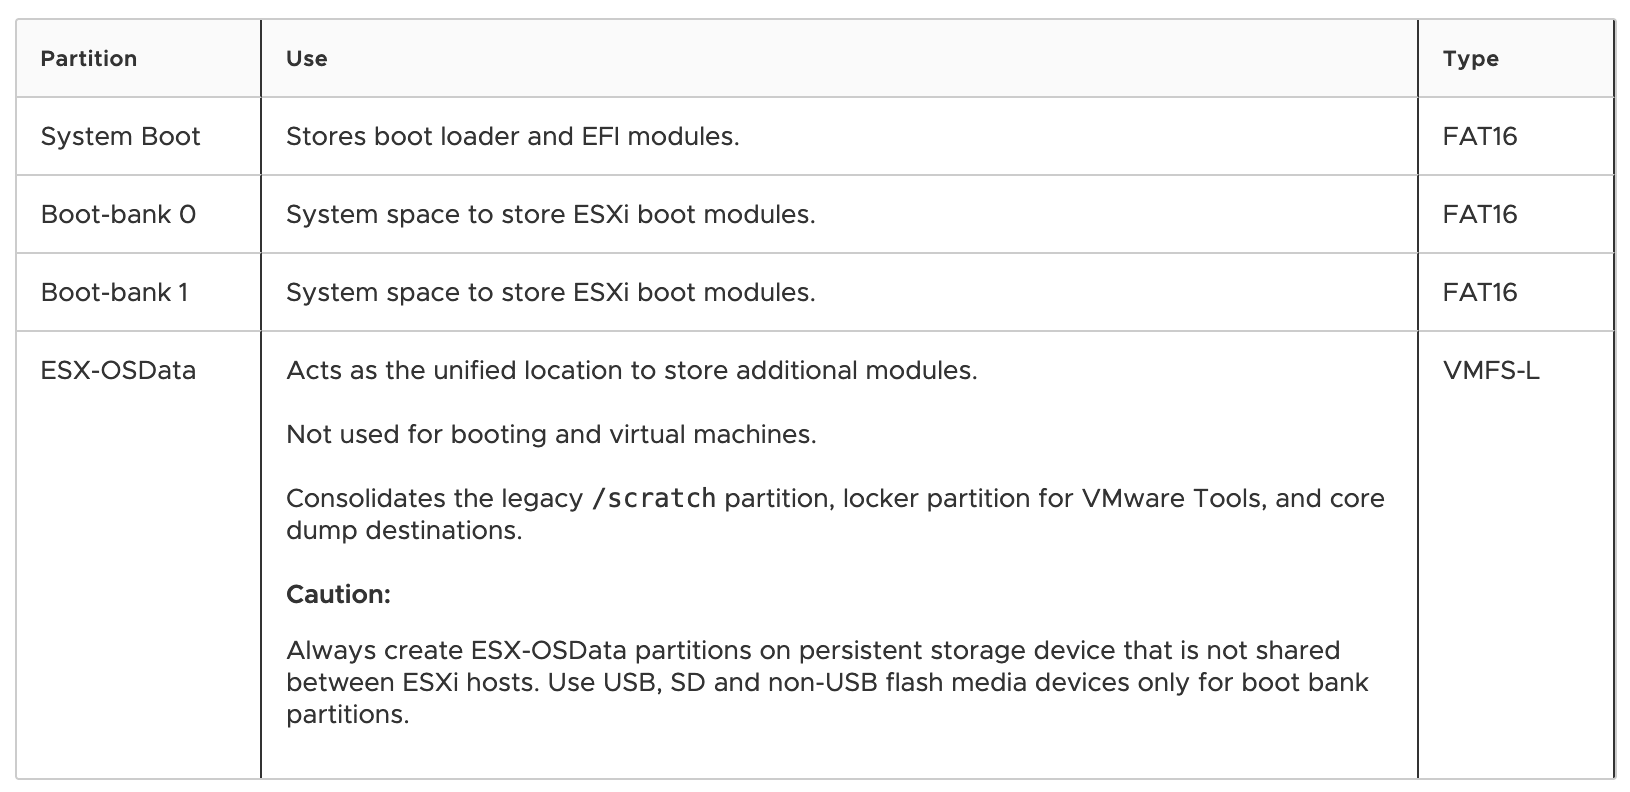
With the driver added, ESXi boots perfectly to get to the installer screen. In my case I use the Transcend USB stick for the “system boot” and both bootbanks partitions and the WD SSD for the “ESX-OSData” partition as describes in the ESXi System Storage Overview documentation.
Management network
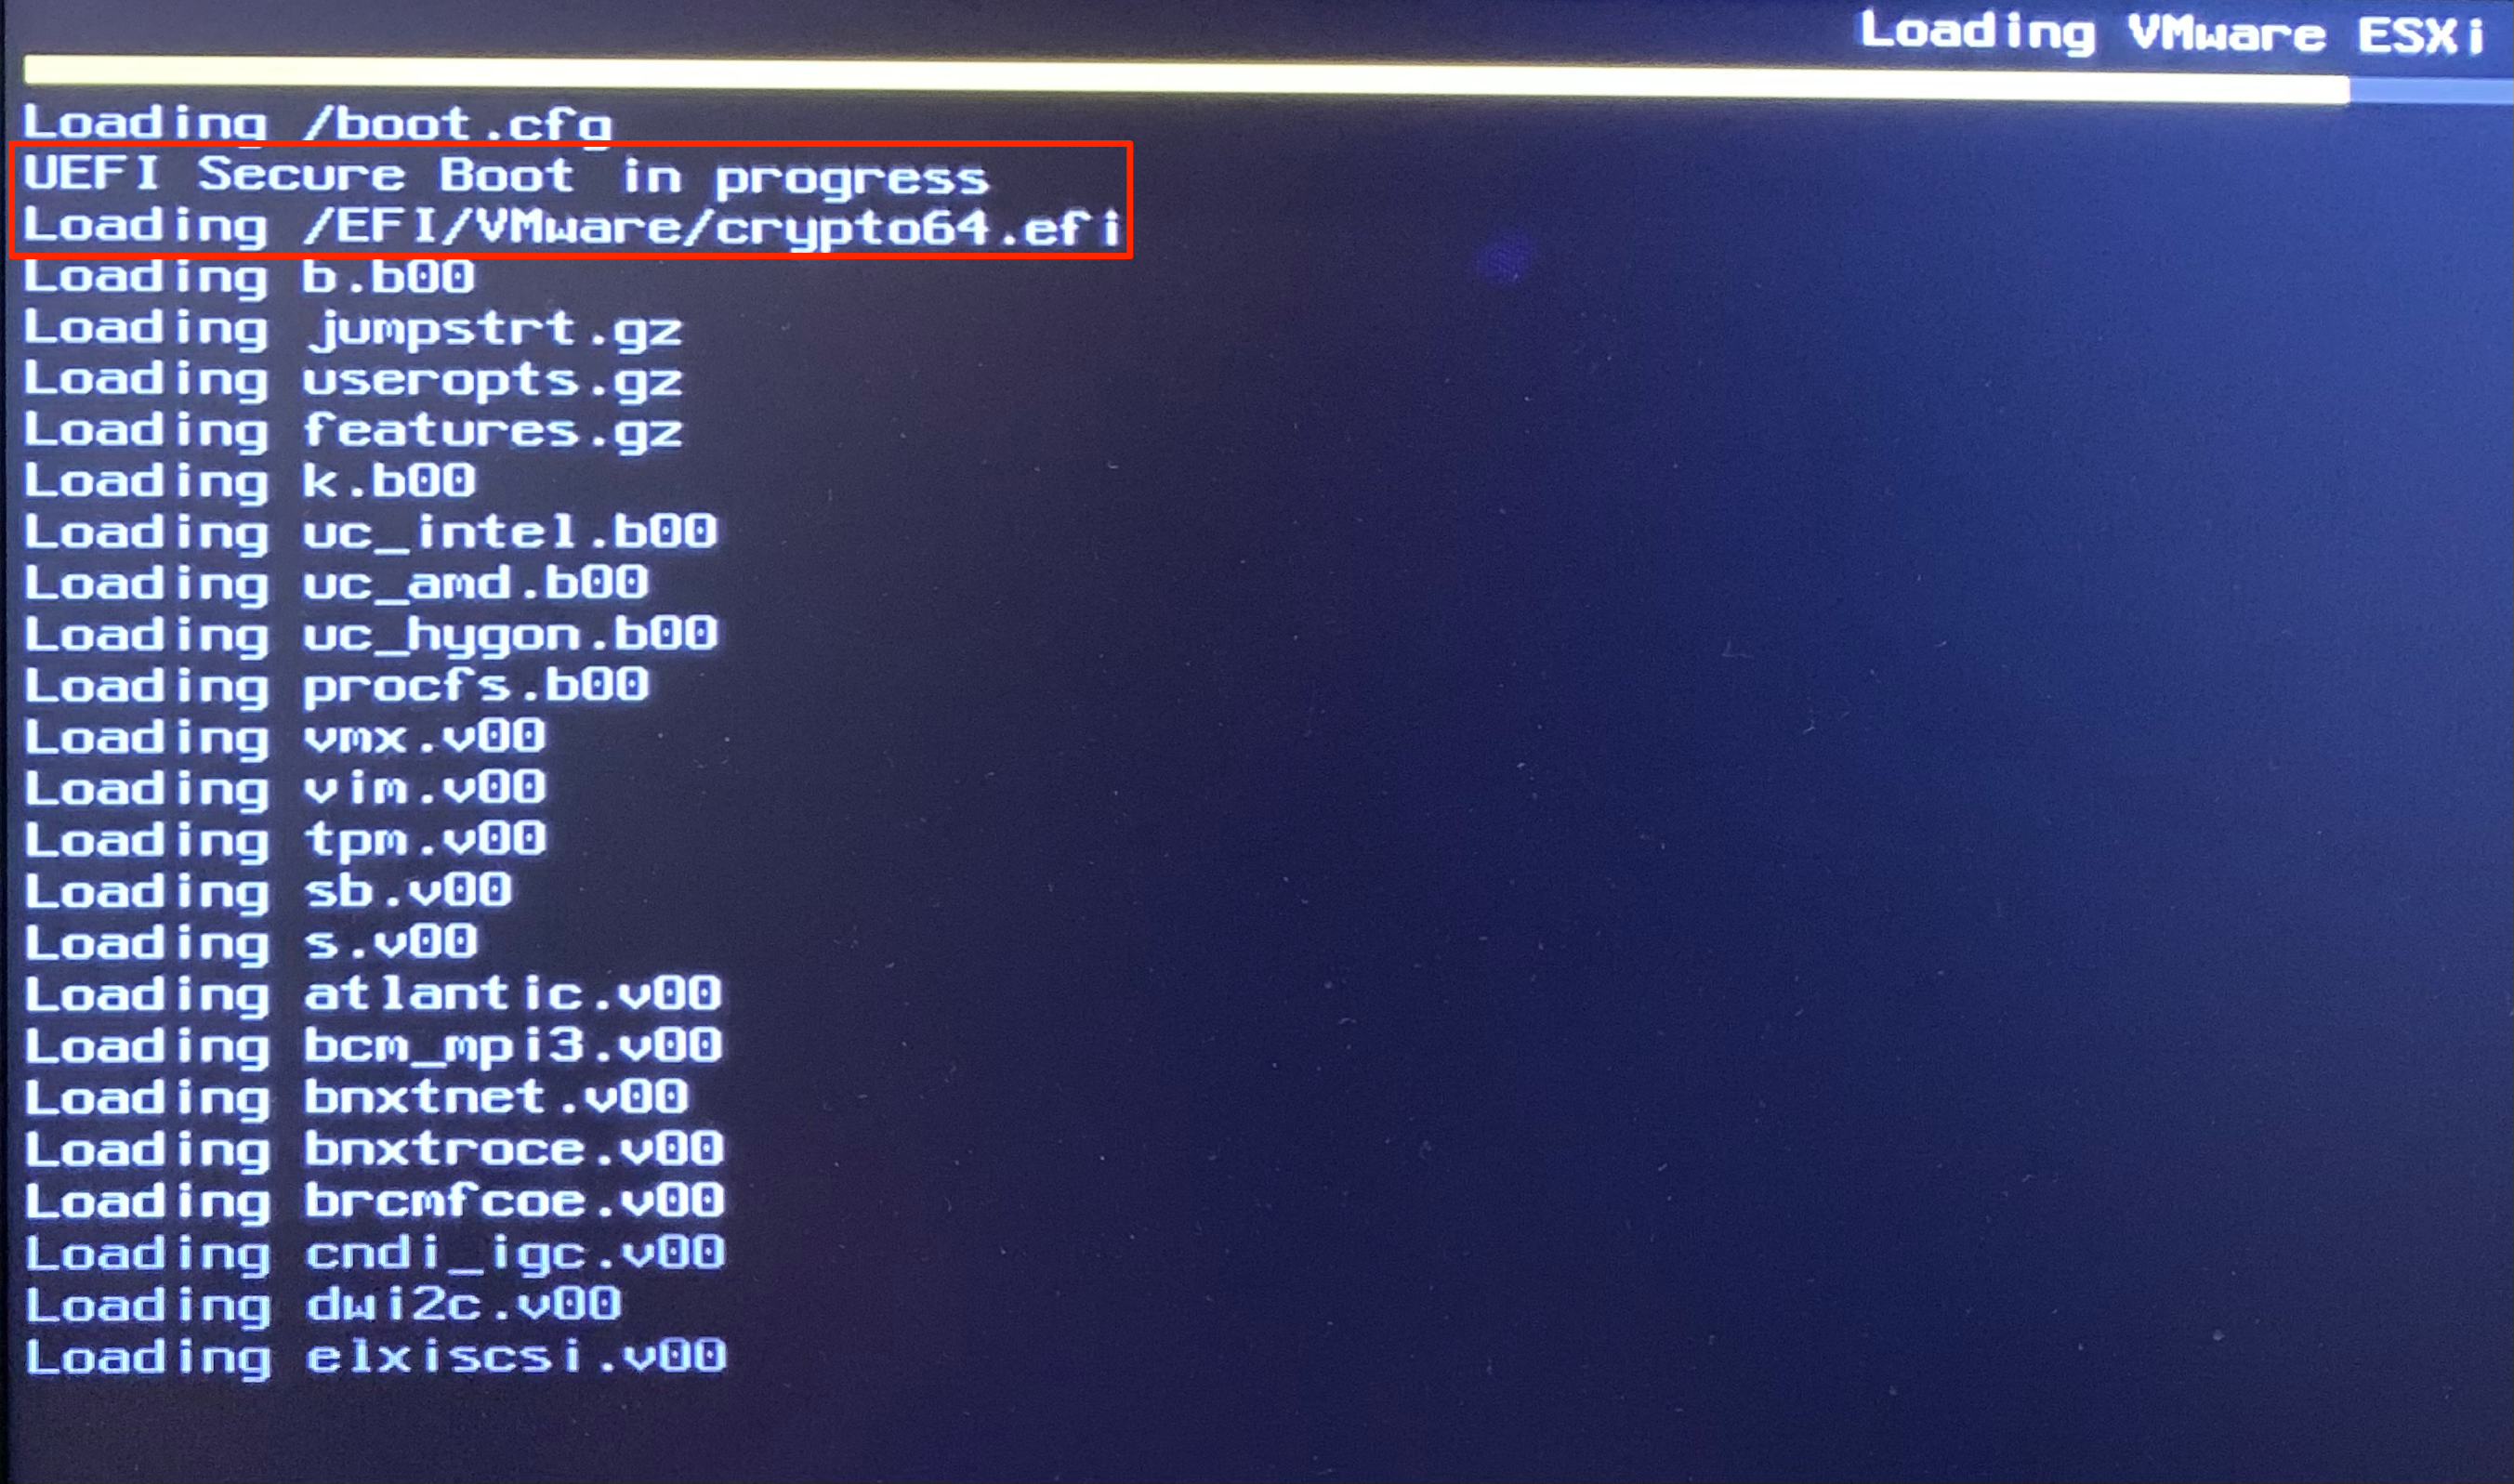
When the customized ISO is flashed to a USB stick and you booted the NUC with it, ESXi boots normally, but fails while installing at roughly 70% with the error below. This even happens when fling driver for USB Network devices is added. It turns out that by only adding the driver it’s not sufficient to install ESXi.
------ An unexpected error occured ------
See logs for details
Exception: No vmknic tagged for management network was found.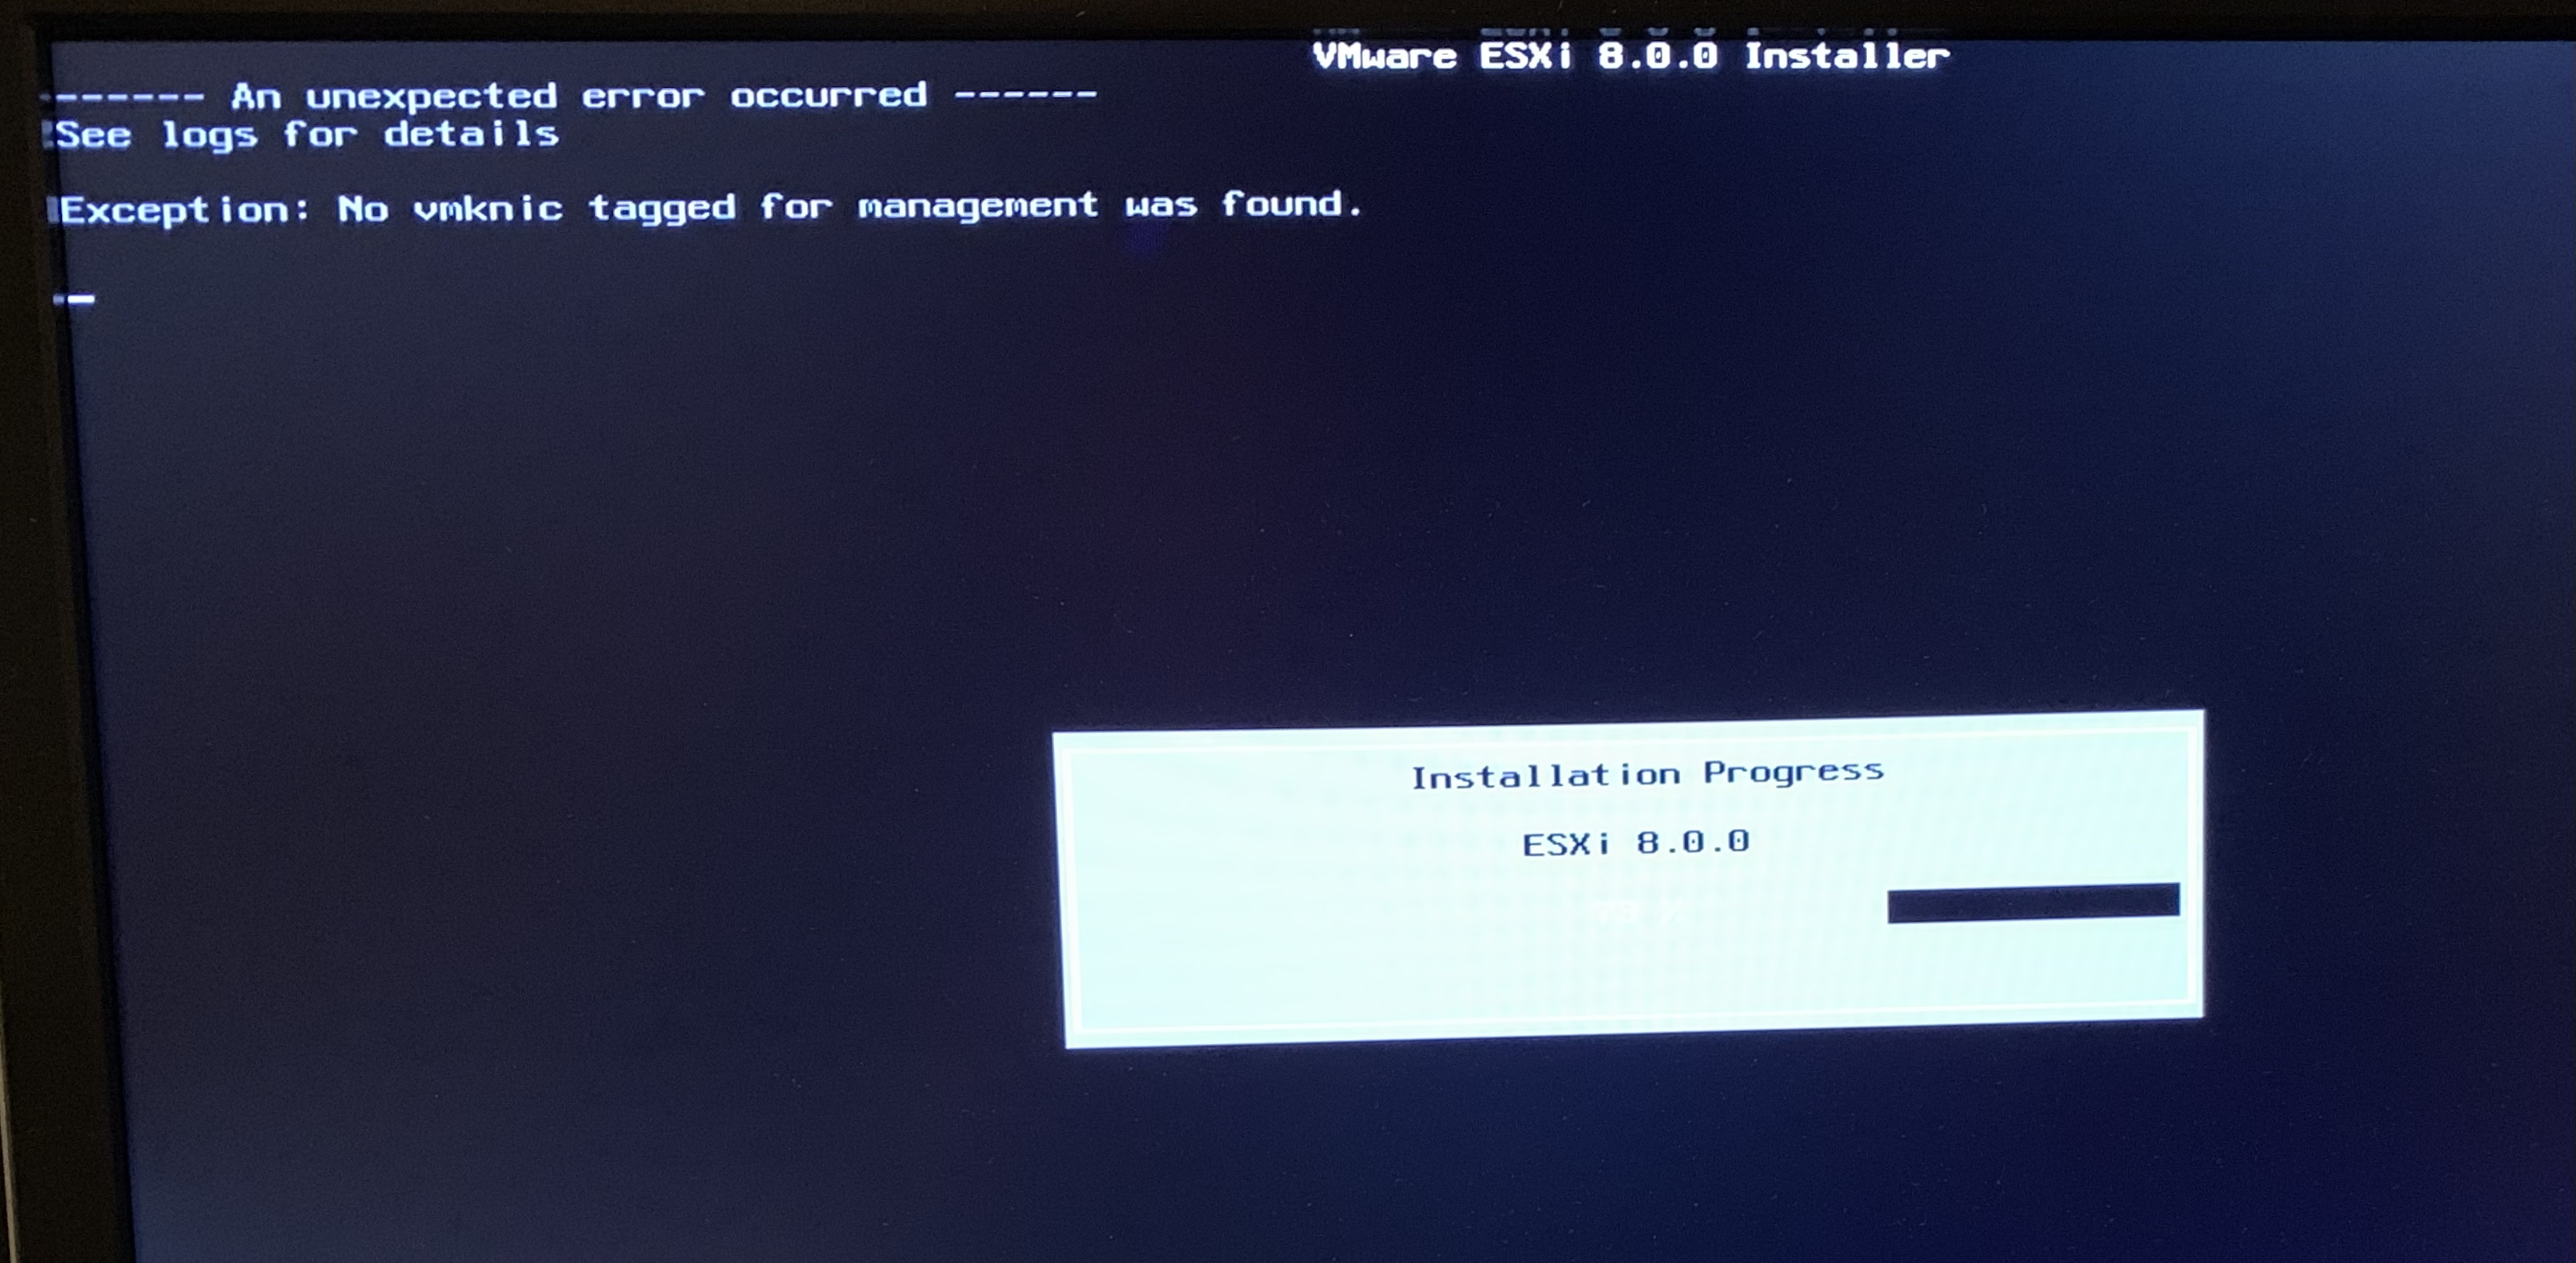
I found the solution in the comments section of the USB Network Native Driver fling site. Fellow community member Daniel Casota showed how to fix the issue in his comment:
## Press ALT-F1 and login (root / no password )
# esxcfg-nics -l should display a vusb0 adapter. Write down the mac address value.
# display information about vmkusb_nic_fling
localcli system module get -m vmkusb_nic_fling
localcli system module parameters list -m vmkusb_nic_fling
#set mac address value and usbBusFullScanOnBootEnabled=1 in a combined command
#Assuming a single USB NIC is used
#Thanks @MichaelCade1 for providing the feedback, appreciated
localcli system module parameters set -p "vusb0_mac=<MAC Address> usbBusFullScanOnBootEnabled=1" -m vmkusb_nic_fling
# add vSwitch0
localcli network vswitch standard add --vswitch-name="vSwitch0"
# add vusb0 to vSwitch0
localcli network vswitch standard uplink add -u vusb0 -v "vSwitch0"
# add the Management Network portgroup
localcli network vswitch standard portgroup add --portgroup-name="Management Network" --vswitch-name="vSwitch0"
# list the vSwitch0 configuration
esxcfg-vswitch -l
# configure vmkernel network interface
esxcfg-vmknic -a -i DHCP -p "Management Network"
# A message appears "GetManagementInterface: No interface was tagged for mgmt, selecting new one VmkNic: ProcessTagChanges: Refreshing DCUI after adding management vmknic"
## Switch back to the install with ALT-F2 and hit ENTER. Now the setup dialog restarts. Install with the same parameters. This time the setup should finish successfully.
## In my case I installed ESXi on a USB stick, while the OSdata is installed on the NUC's SSD device.
Security
So how about securing your ESXi install using Secure Boot and the TPM. In short, Secure Boot works like a charm, but the TPM can best be disabled in the BIOS, because it’s not compatible with ESXi.
Secure Boot
To enable Secure Boot, enter the BIOS > ‘Security’ > ‘Secure Boot’. First enable it (Disabled by default) and secondly set the ‘Secure Boot Mode’ to “Standard”. After saving and a reboot, Secure Boot is enabled as seen below.
TPM
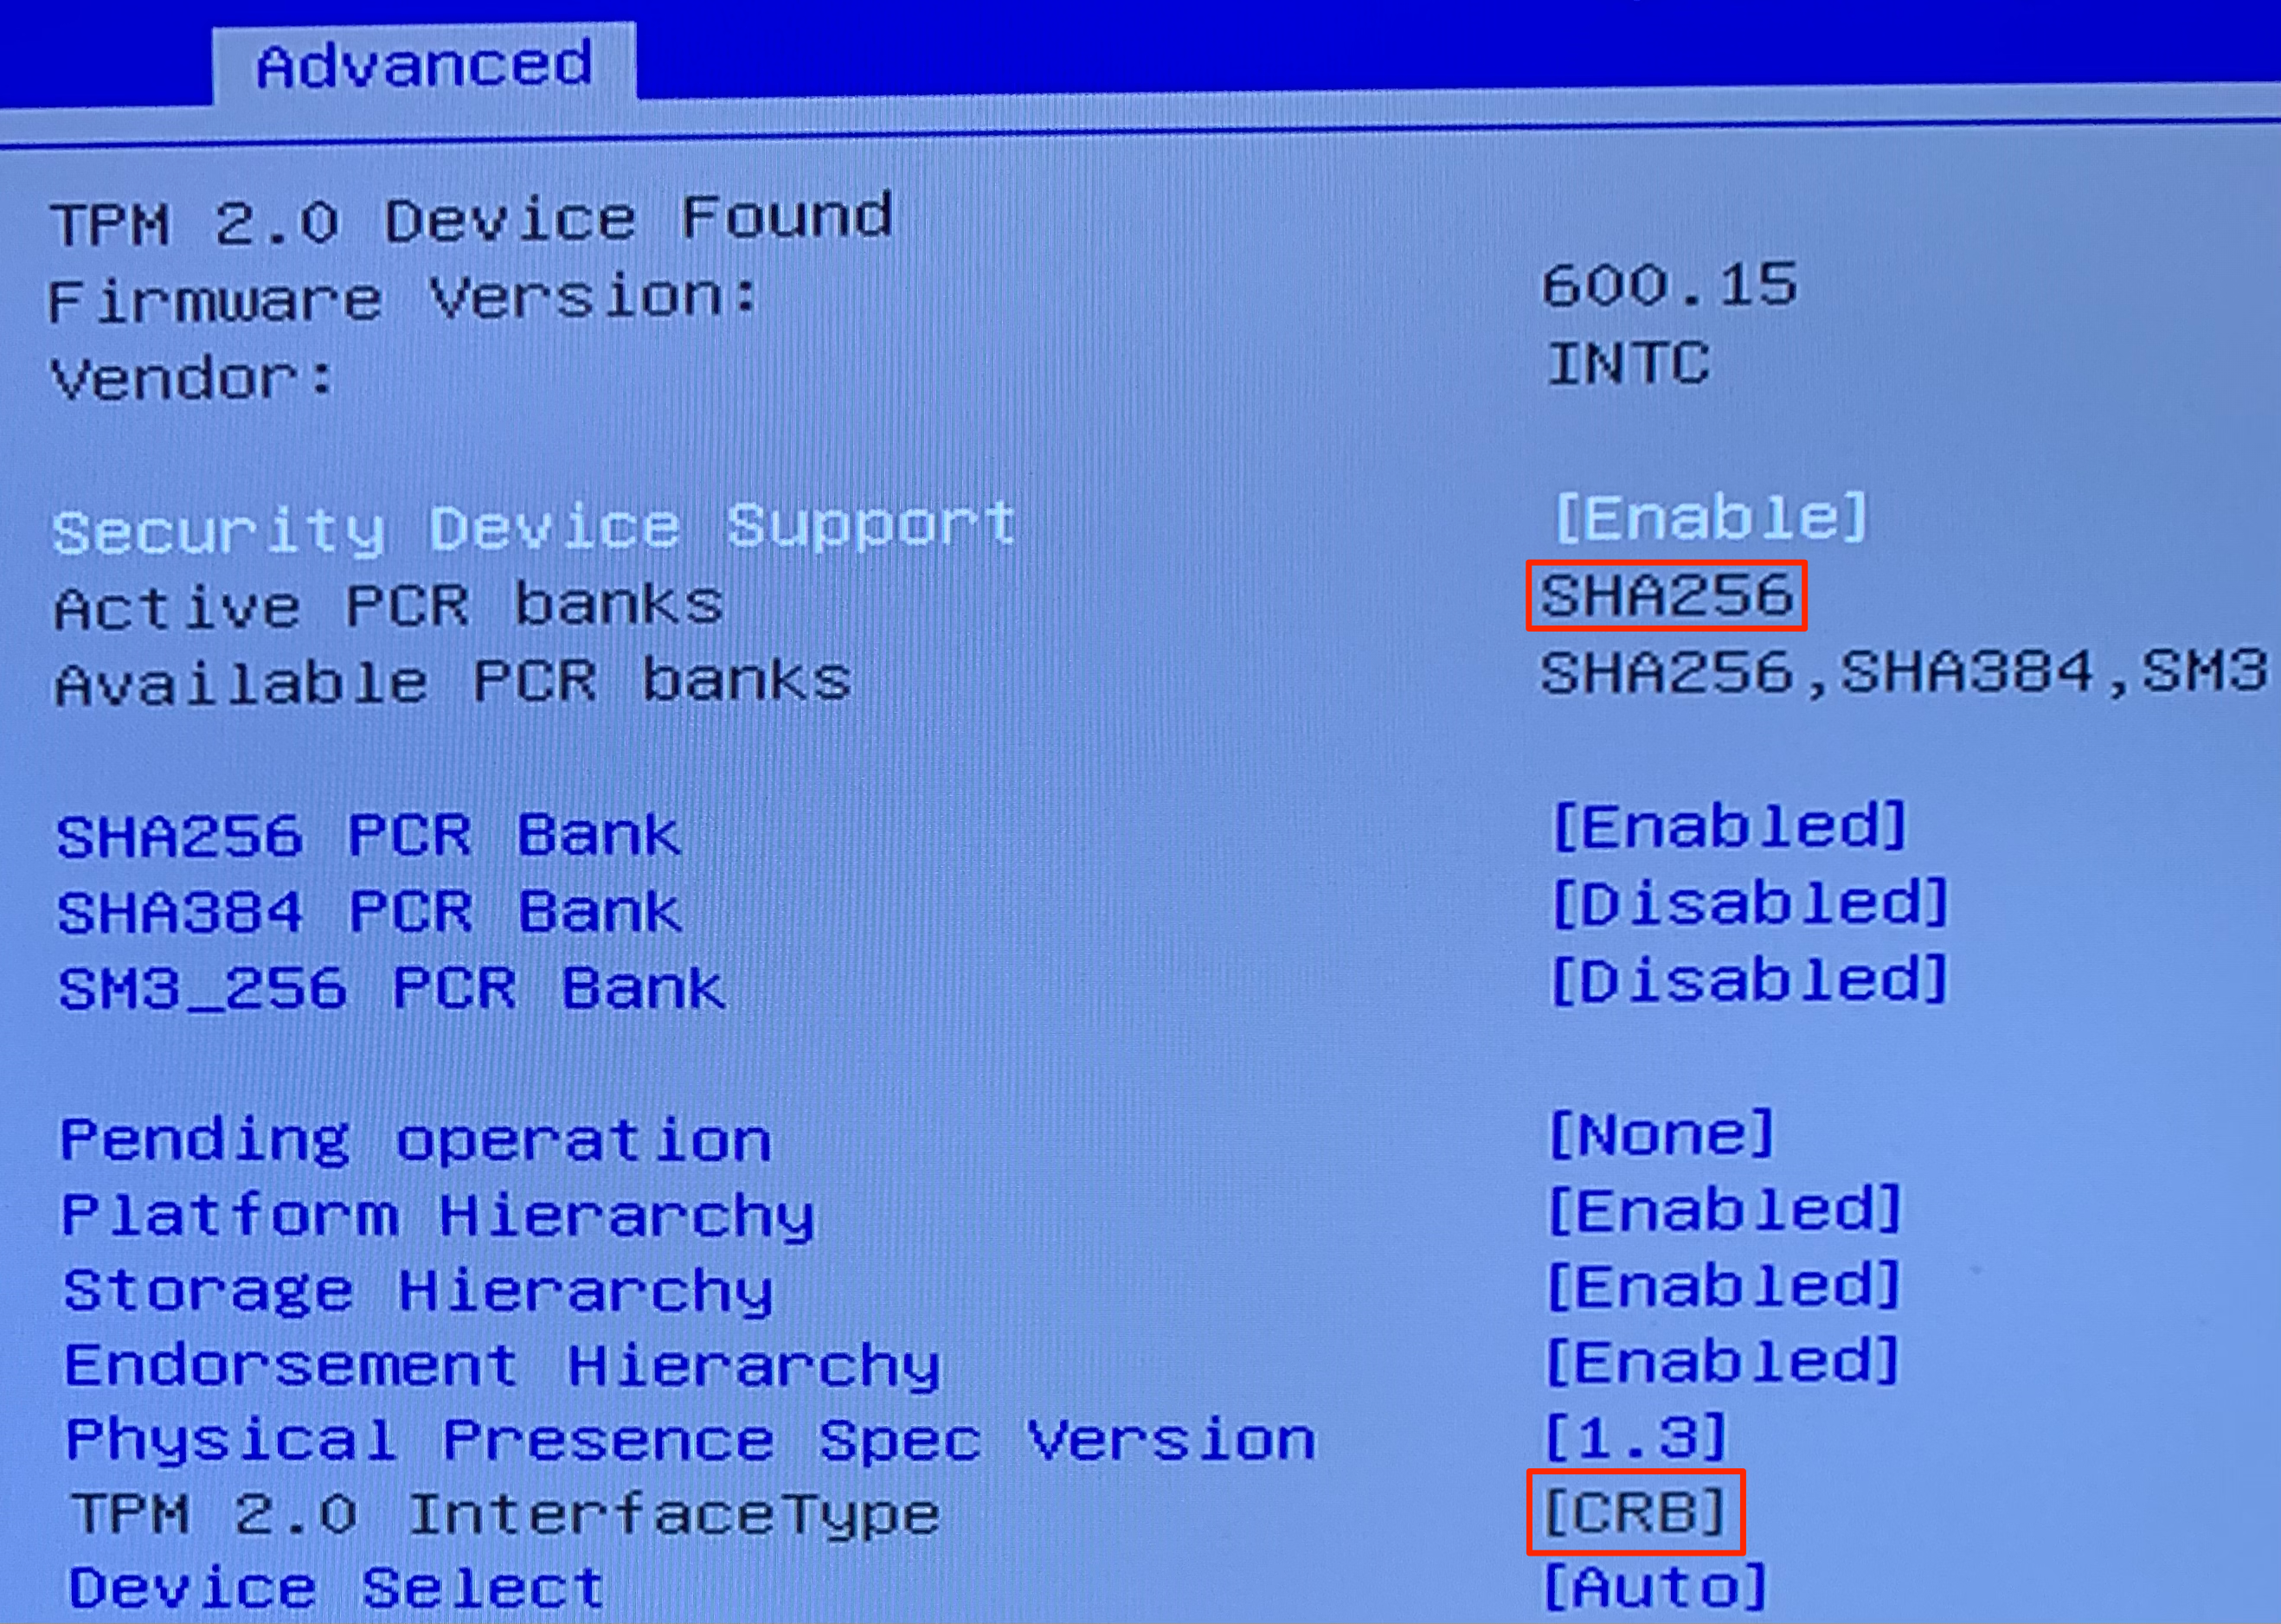
Based on the vSphere 8 documentation about TPM requirements and the vSphere blog about configuring TPM 2.0, the requirements for a functional TPM chip are:
- UEFI Secure Boot enabled
- TPM 2.0 device installed and enabled in UEFI
- TPM device config
- Use SHA-256 hashing
- Use TIS / FIFO ((First-In, First-Out) interface and not CRB (Command Response Buffer)
- Disable TXT
- Use SHA-256 hashing
When one of the requirements are not met, the message below shows during the boot process.

It also raises an alarm in the Host Client or vCenter. In vCenter is would probably show as an ‘Attestation failed’ alarm or somewhat similar as shown below.
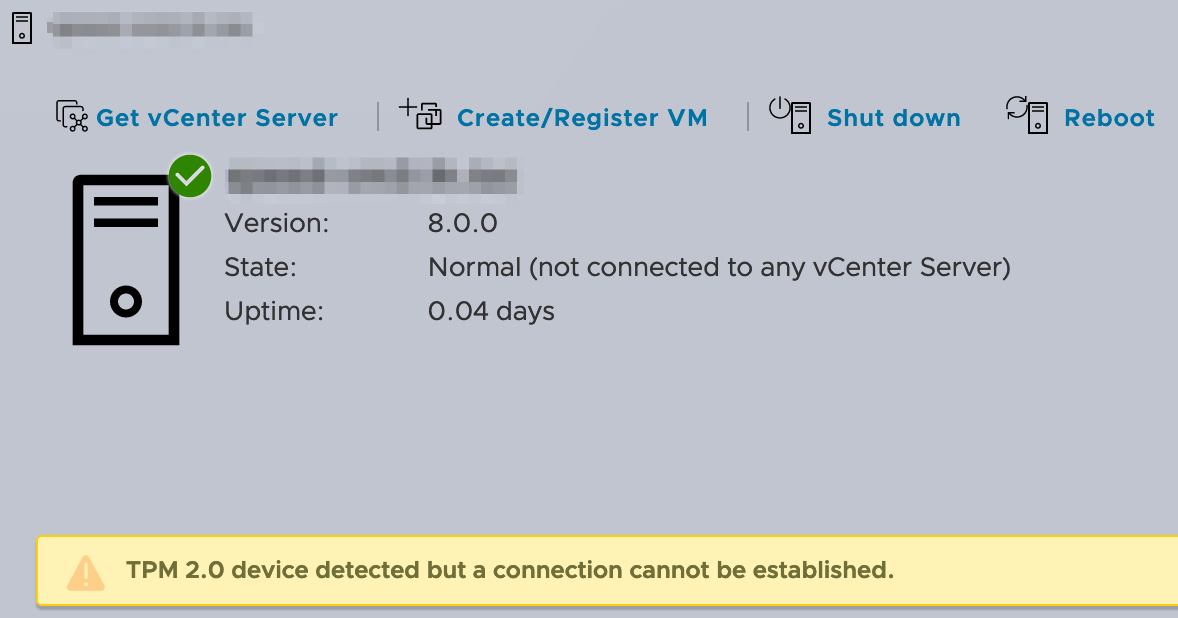
Unfortunately the Maxtang NUC does not support FIFO (only CRB) and therefore is not functional with ESXi. Even if SHA-256 is supported in the BIOS.
To get rid of the alarms shown above, disable the TPM, save the setting and boot ESXi again.
Using the ‘unsupported’ NIC’s
Now ESXi is installed at the NUC, let’s focus on which config needs to be done to be able to use both Realtek NIC’s that are unsupported by ESXi. Since they are unsupported, you cannot use them as an uplink for a vSwitch.
It makes sense to use ESXi’s PCIe passthough feature, aka. (Dynamic) VMDirectPath. Beware that some limitations will apply to VM’s using passthough devices, such as:
- Snapshots
- Suspend / Resume
- Fault Tolerant (FT)
- Full memory reservation
- Up to 16 passthrough devices per VM
- in vSphere 7 and higher
When the device is added as Dynamic VMDirectPath device, it does support HA and DRS.
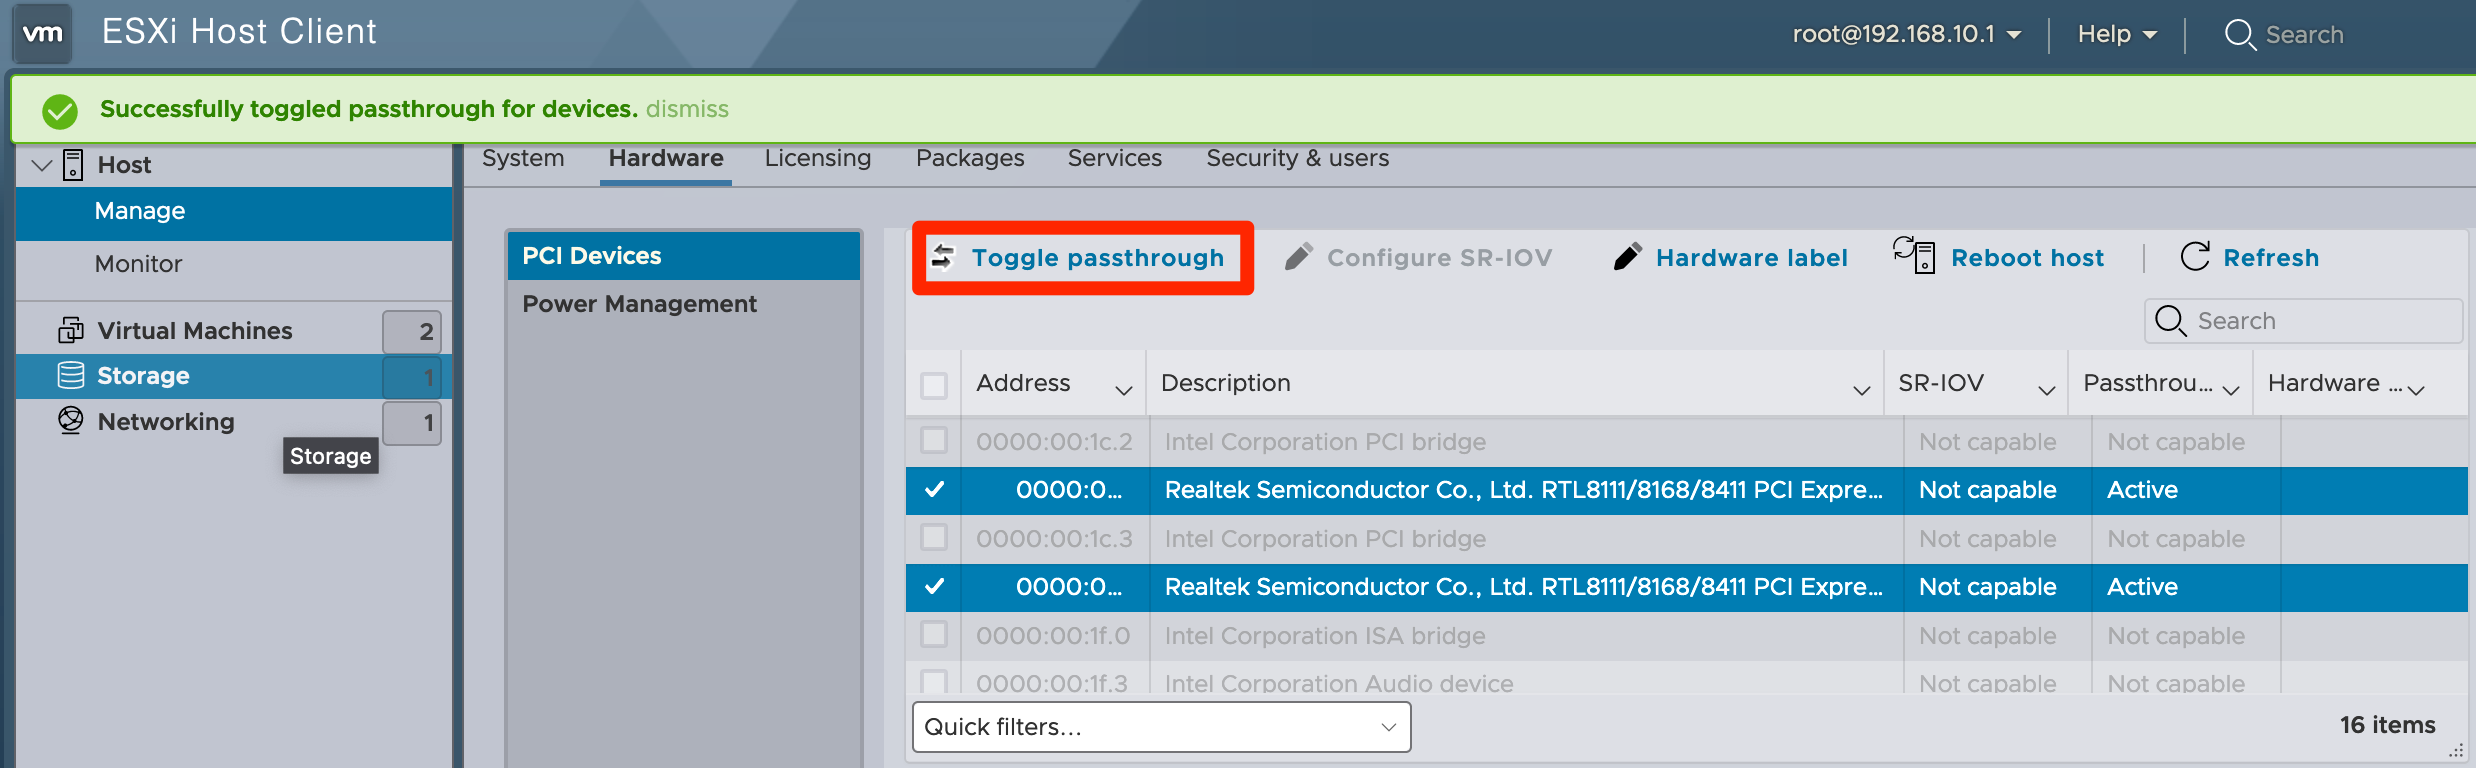
Configure device passthrough in ESXi
Since I haven’t added the host to vCenter, so I use the ESXi Host Client to enable device passthrough for both NIC’s. Open the ‘PCI Devices’ in the section shown below and ‘Toggle passthrough’ so both are “Enabled”.
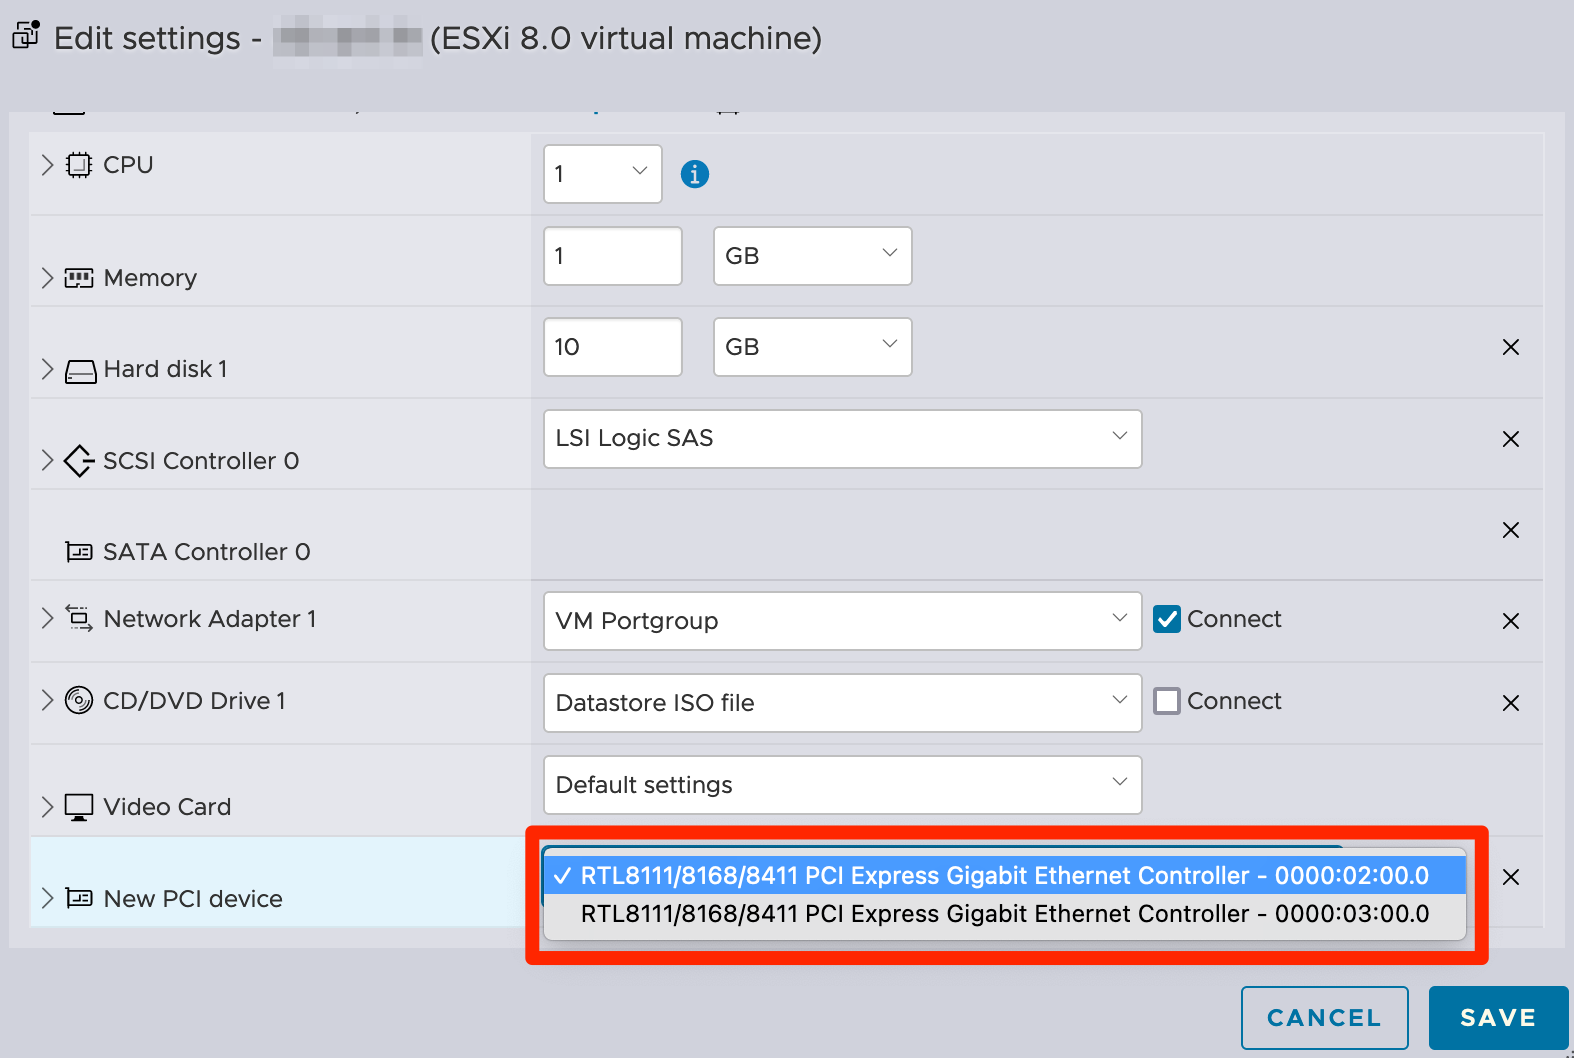
Add passthrough devices to a VM
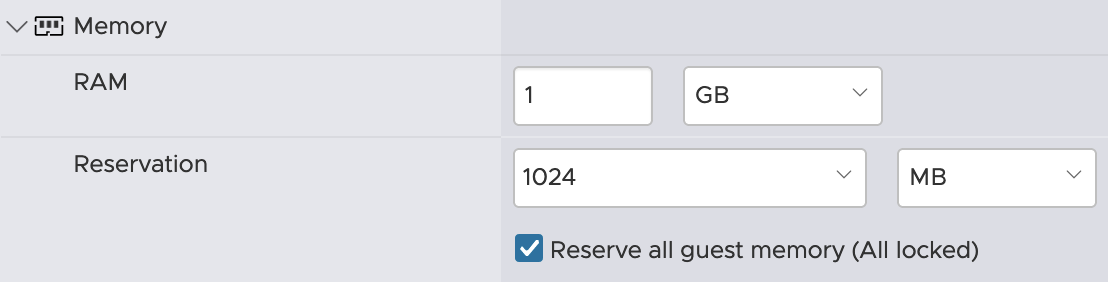
To be able to add the PCI device to a VM, first ‘Reserve all guest memory’.
Secondly add the NIC as ‘(Dynamic) PCI device’. The non ‘Dynamic’ is the legacy method for DirectPath I/O, where the ‘Dynamic’ one uses the Assignable Hardware framework introduced with vSphere 7 and therefore has HA and DRS support. The workflow of both are similar, so I’m only showing the legacy one.
From the vSphere blog above:
No longer is the hardware address of the PCIe device directly mapped to the virtual machine configuration file (the .vmx file). Instead, the attributes, or capabilities, are exposed to the virtual machine
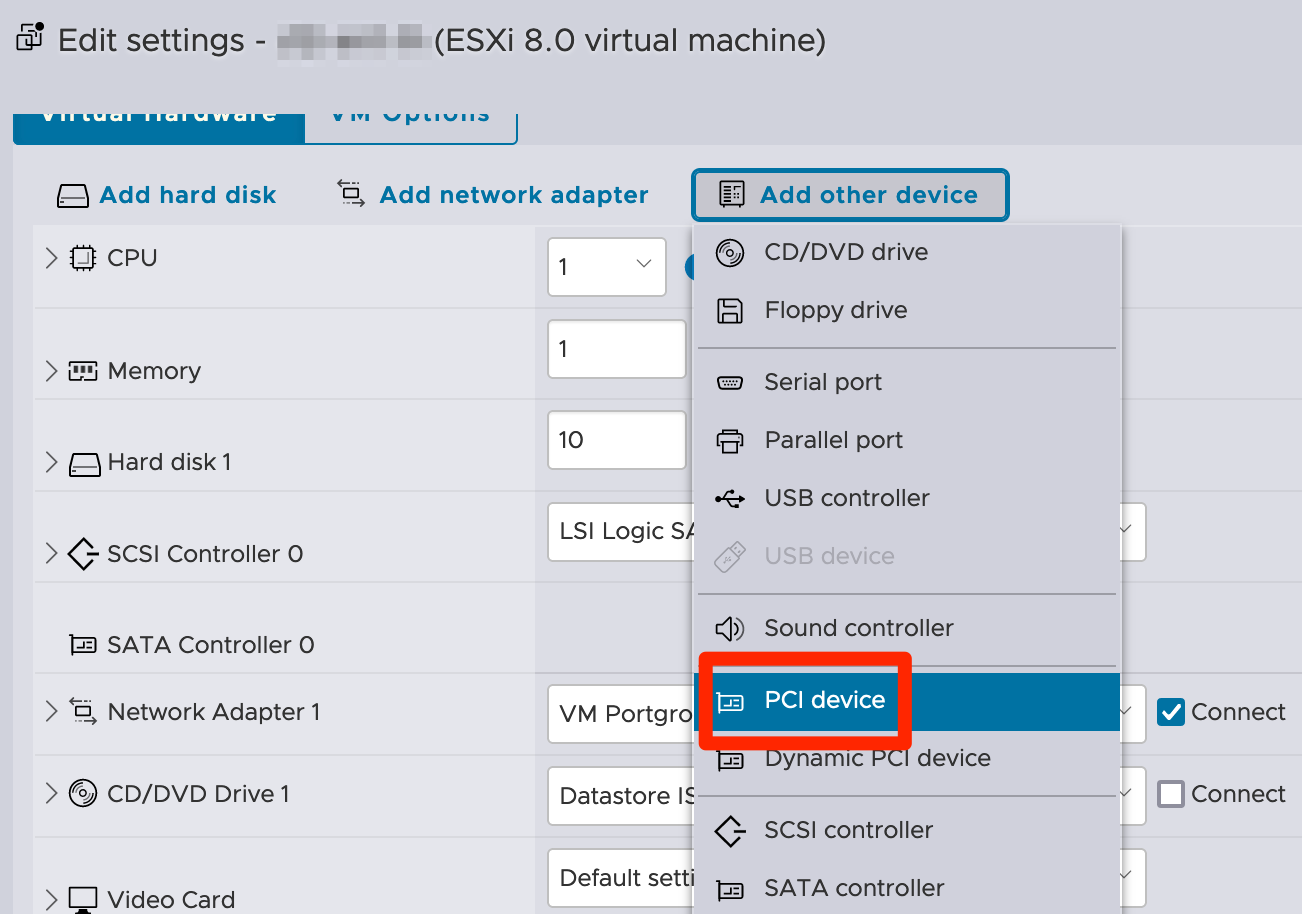
Select one of the NIC’s (or both)
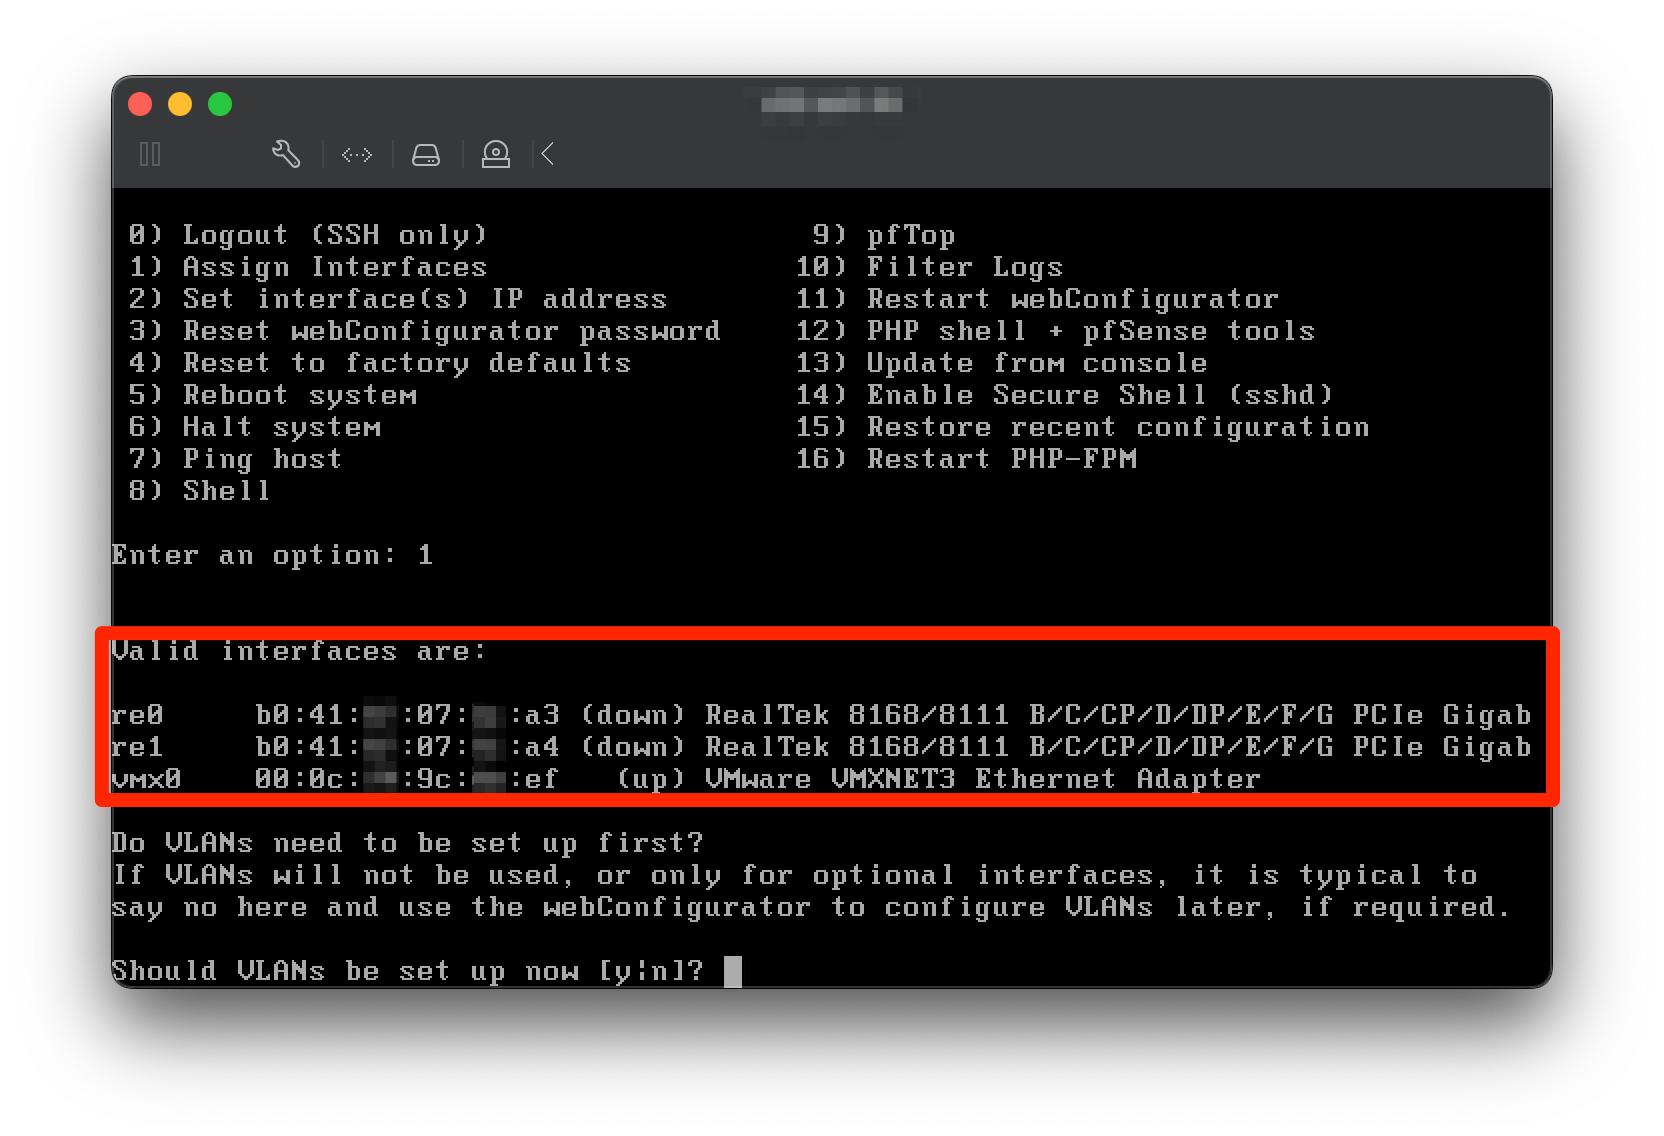
When the VM is booted, both NIC’s show up in the ‘Interfaces’ list of this demo pfSense VM. This shows that even when a NIC device is not supported by ESXi due to outdated or non-existing drivers, they still can be used inside a VM to take advantage of the full NIC speed and features. Secondly this lowers the load on the relative slow USB based management NIC.
To conclude
Although the Maxtang NUC does not have ESXi supported NIC’s and TPM chip, it’s still very usable in the homelab. ESXi can be installed and booted by using a USB based NIC for the management network vmkernel port.
When running a high performance router, it can still use the ‘Unsupported’ Realtek NIC’s with near native performance by adding them as (Dynamic) DirectPath I/O devices (passthrough) and use the Linux or BSD drivers for them. In that scenario take into account the limitation, which means no support for:
- Snapshots
- Suspend / Resume
- Fault Tolerant (FT)
Cheers and happy homelabbing 🙂
Useful links
vSphere documentation – vSphere 8 TPM requirements
vSphere documentation – ESXi System Storage Overview
vSphere blog – Configuring TPM 2.0 for ESXi
vSphere blog – Assignable Hardware framework
VMware Fling – USB Network Native Driver fling

5 Comments
Petar Brcic · December 16, 2022 at 10:02
Great article Daniël! Good job, you really make a huge effort! I have also looked and additional reference links regarding TBW specification for SSD disks, all recommendations.
Congrats Daniël 👏
Daniël Zuthof · December 16, 2022 at 11:11
Thanks for your kind words, Petar. Great to hear your feedback 😀
jeremy hall · July 23, 2023 at 13:16
YOu should make a correction as It was “NOT” Cohesity that sponsored the gift from vExpert. it was NetApp, specifically the FlexPod division.
I happen to know this, well because I am the one that worked with the vExpert team to sponsor this gift from NetApp.
Daniël Zuthof · July 23, 2023 at 14:16
Hi Jeremy. Thanks for mentioning. I’m pretty sure, the EU Explorer was a co-gift with Cohesity. Let me verify that.
Daniël Zuthof · July 26, 2023 at 15:08
Hi Jeremy. I reached out to the community manager to make sure. It’s like this:
The Explore US kits were sponsored by NetApp indeed. So, thanks a lot for helping the vExpert community.
The Explore Barcelona kits were sponsored by Cohesity. That’s the kit I referred to.
Cheers, Daniël